For more information about accessing learning spaces on campus, classroom recording, and streaming, please visit the UBC Learning Spaces website.
Starting March 31, 2024, UBC will be deleting Zoom video recordings that are one year or older. The Zoom URLs to these videos will no longer be active. We recommend that any videos which need to be used in 2023W2 be downloaded and moved to Kaltura earlier. A backup of the Zoom videos has been made and will be available for access later on. Additional information will be shared once this service is available.
Zoom is a web conferencing tool that allows you to deliver lectures and host meetings online in real-time. Zoom is available on desktop and mobile devices. Instructors and students can interact with each other by sharing their audio, video or screens, as well as send messages through the Chat feature. Instructors can also split up the students into smaller groups for collaboration (using breakout rooms).
To view a detailed description of Zoom’s meeting and webinar features, or how to enable closed captioning, please refer to the Zoom Features page.
Requesting a UBC Zoom account
Instructors:
- Email the UBC IT Audio/Visual Helpdesk at av.helpdesk@ubc.ca with:
- Your UBC email address
- Your Faculty and Department
- The number of students in your course
- Activate your UBC Zoom account:
- Once AV Helpdesk gets to your ticket and provisions your UBC Zoom account (not instantaneous), they will send you an email to activate your new UBC Zoom account.
TAs:
- Pick an email account that has “ubc.ca” in it somewhere (e.g. @cs.ubc.ca; @ubc.ca; @student.ubc.ca, etc). If you don’t have an email like this, get an @student.ubc.ca account. Instructions are here.
- With that email account you chose, request a UBC Zoom account:
- Email the UBC IT Audio/Visual Helpdesk at av.helpdesk@ubc.ca CC the instructor(s) for whom you are TAing
- Use subject line: “TA Zoom account needed”
- Message should read (fill in appropriate information): I am a TA in [Course XXX] with [instructor name]. I need a UBC Zoom account using this email: [insert the email address with ubc.ca in it that you chose above].
- Be sure to cc your instructor(s)
- Change your email in the relevant UBC systems, SSC and Canvas:
- In the SSC, change your email to the one you chose above, with ubc.ca in it.
- In Canvas, go into your Canvas profile and make this your primary email address.
- Activate your UBC Zoom account:
- Once AV Helpdesk gets to your ticket and provisions your UBC Zoom account (not instantaneous), they will send you an email to activate your new UBC Zoom account. The email will come to the email you chose above (with ubc.ca in it). Activate your account as soon as possible.
Activating your UBC Zoom account
Once AV Helpdesk gets to your ticket and provisions your UBC Zoom account you will receive an email to activate your new UBC Zoom account.
- Click Activate Your Zoom Account in this email.
- You may be asked to verify your date of birth to confirm that you are at least 16 years old. This is due to Zoom’s security measures for educational licenses.
- In the webpage that opens for activating, click Sign Up With A Password.
- Fill in your first and last name, create a password (please use something different than your CWL) and click Continue. You now have a UBC Zoom account.
- If you have an existing Zoom account, you will be prompted to approve moving it into UBC’s account. Contact the A/V Helpdesk if you have any concerns about doing so.
- The Zoom application should automatically download for you to install. If it doesn’t, go to, go to https://zoom.us/download, and click Download under “Zoom Desktop Client”.
- Open the Zoom installer that downloads, and follow the steps to install the Zoom application.
Zoom allows you to deliver real-time lectures to large courses. Please refer to this instructor guide to help you get started. A student guide is also available for you to share with your students.
Requirements
- You need to have a UBC Zoom account. If you do not have an account yet, follow these instructions to request for one.
- Check to ensure the primary email address (the one with a star icon) associated with your Canvas account is the same as the email address used for your UBC Zoom account. In Canvas, click on Account > Settings and look under Ways to Contact.
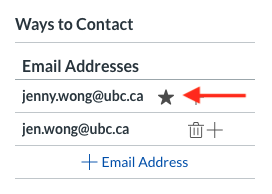
If the email address is different from the one used for your UBC Zoom account, follow these instructions to update your email address. Make sure it is selected as the default email address.
Add Zoom to the Course Navigation
- Click into your Canvas course. On the left hand menu, click Settings.
- Click on the Navigation tab and then look for Zoom from the list.
- Click on the three dots beside Zoom, and choose + Enable. Zoom will be added to the list above, you can drag and drop to where you would like it to appear in your course navigation menu.
- Click the Save button.
- Click on the Zoom link from the left navigation menu.
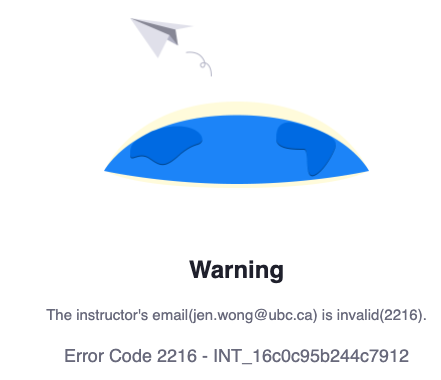
NOTE: If you see a Warning message with an error code (as shown below), you will need to ensure the email address associated with your Canvas account is the same as the one used for your UBC Zoom account. - Click on the Schedule a New Meeting button.
- Enter in the topic, date/time, and adjust any other settings that you wish.
- Use Personal Meeting ID (PMI): this is a persistent session link which allows anyone to join at any time, which is not recommended for courses.
- Only authenticated users can join: this requires participants to log into their Zoom account before joining the meeting, which most students will not have.
- Click Save.

NOTE: Keep the following meeting options unchecked:
If you have tutorials, labs, or office hours led by TAs, we recommend that the TA in charge of the tutorial/lab/office hour be the same TA that sets up the individual Zoom meeting link on a recurring basis. This will prevent any issues with concurring meetings. (Note: TAs will need a UBC-created Zoom account in order to schedule meetings in Canvas. Please refer to the section Request a UBC Zoom account
Tip: Post the tutorial/lab/office hour links for the whole term somewhere easily accessible by students, such as on the Canvas homepage or a separate content page. In addition, use the same passcode for all the sessions to keep things consistent.
Starting a meeting
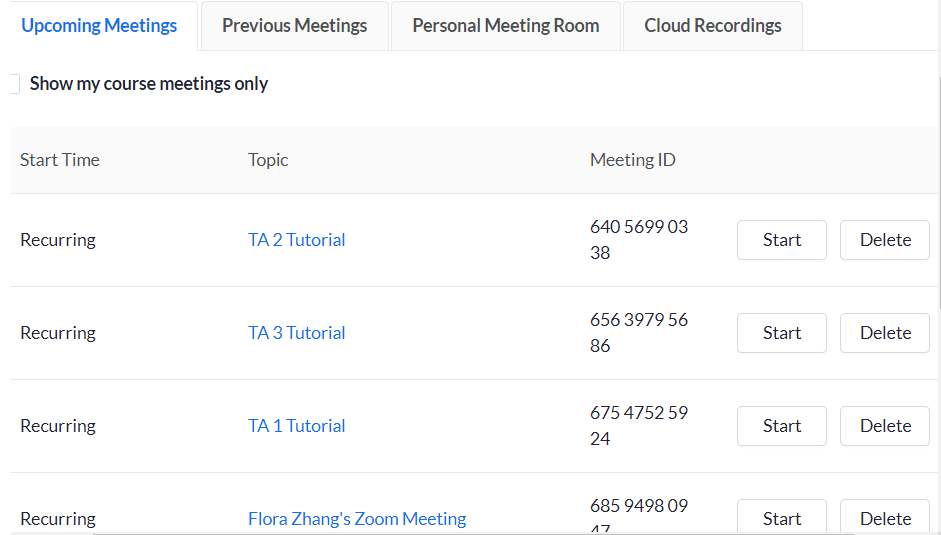
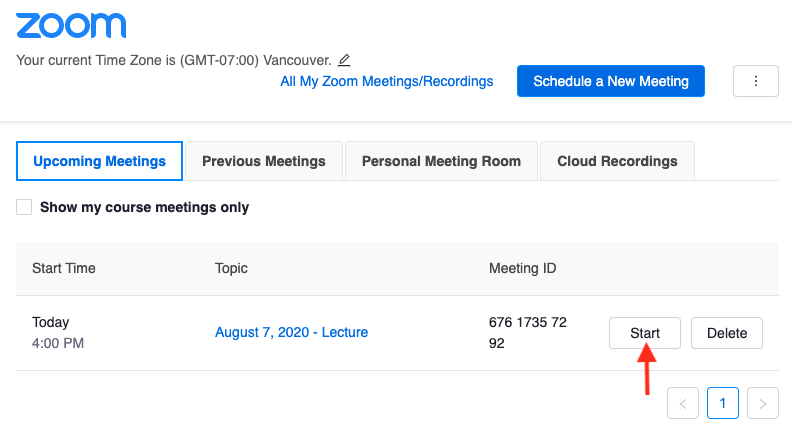
- Click on the Zoom link from the course navigation menu.
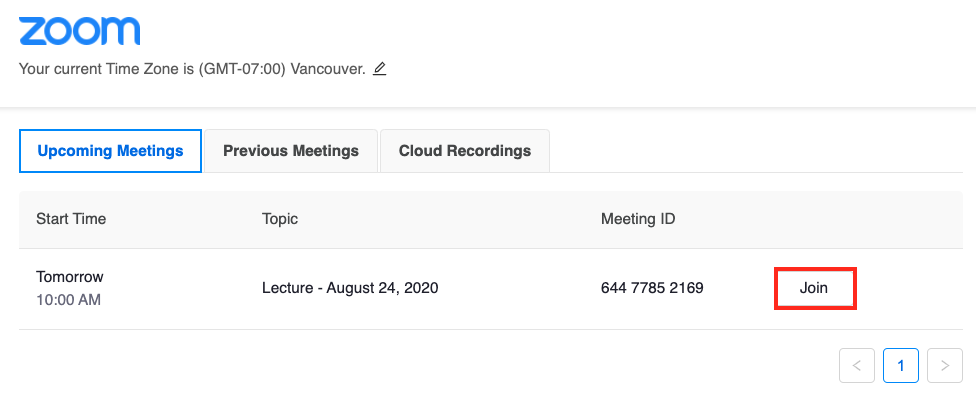
- You will see a list of the scheduled Zoom meetings. Click on the Start button beside the meeting you want to launch.
If you have multiple Instructors/TAs in the same course, they will be able to schedule meetings as well if they have a UBC Zoom account. A Start button will appear beside the meetings you create and a Join button will appear beside the meetings created by others. Students will see a Join button beside all meetings.
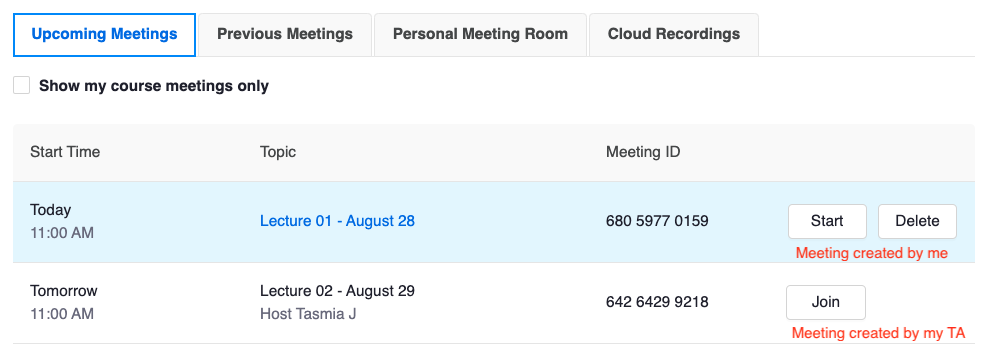
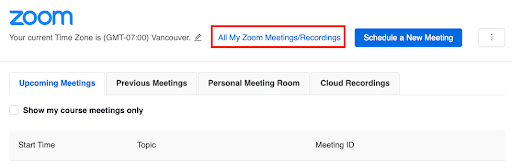
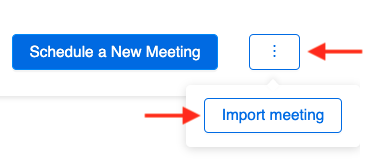
NOTE: If you scheduled meetings through the Zoom desktop application or the web portal (https://zoom.us/ > Meetings), those meetings will appear under All My Zoom Meetings/Recordings. However, these meetings will not be visible to students. Only meetings scheduled through Canvas (located under Course Meetings/Recordings) will be visible to students when they click on the Zoom link from the course navigation menu.
You can import the meetings by clicking on the three dots located on the right > Import Meeting. You will have to enter in the Meeting ID, which can be found under your meeting settings.
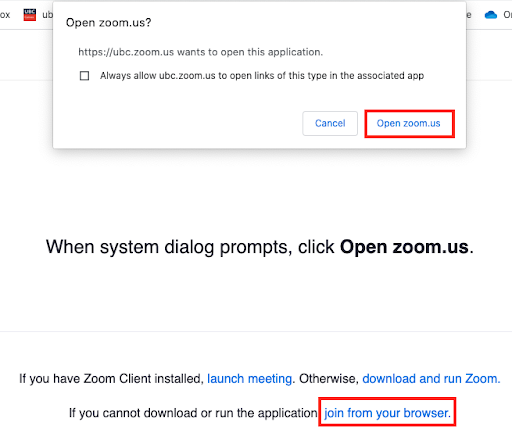
- Zoom desktop application (click Open zoom.us): the student’s name displayed in Canvas will be the name that appears in Zoom.
- Web browser (click join from your browser): the student will be asked to enter a name themselves.
How will students join the meeting?
Students can join the meetings by clicking on the Zoom link from the course navigation menu. Click on the Join button beside the meeting.
Students can choose how they would like to join the meeting:
Before recording your sessions, check your local recording or cloud recording settings first. In addition, review the different recording layouts available depending on the video layout of your meeting.
- Click on Zoom from the course navigation.
- Click on the Start button beside the meeting you want to start.
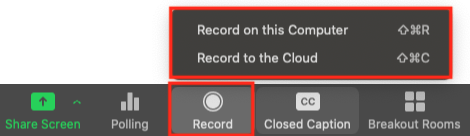
- When you are in Zoom, click on the Record button in the meeting controls and choose if you want to Record on this Computer (local recording) or Record to the Cloud (cloud recording).
Publishing a recording
For Local Recordings, you will need to download the recording from Zoom and then upload to your Canvas course using My Media/Media Upload.
- After you have stopped recording and ended the Zoom meeting, the Zoom recording will be converted to an mp4 file and automatically saved onto your computer. You can locate the recording under your personal computer’s file directory, under Documents > Zoom folder directory.
- If Zoom was unable to convert your recording into an mp4, you can manually convert the recording by locating the desired recording under your Documents > Zoom folder directory, and double-click on a file that starts with “double_click”.
- Follow these instructions to upload the video to Canvas.
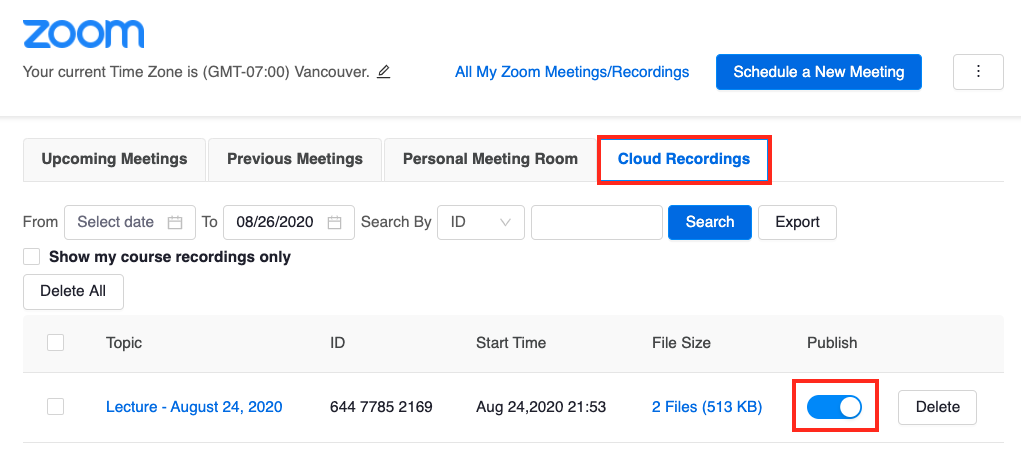
For Cloud Recordings, you will need to publish the recording on Canvas:
- Click on Zoom from the course navigation.
- Click on the Cloud Recordings tab.
- Beside the recording you want to publish, toggle the Publish button to ON, as shown in the image below. When the button is blue, that indicates that the recording has been published and is visible to students.
We strongly recommend instructors to download their Zoom recordings and upload them to Kaltura within Canvas. A guide is here. This will ensure your recordings are stored securely and only accessible to students within your course. On October 31, 2023, UBC will automatically delete Zoom recordings recorded before November 1, 2022. After October 31, 2023, UBC will automatically delete Zoom recordings after 1 year.
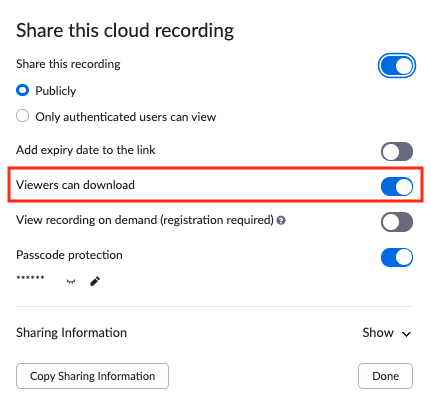
Disabling Download
By default, students have the ability to download the recording. You can disable download by logging into your Zoom account in the web portal, click on Recordings. Look for your recording, click on Share... and toggle the option Viewers can download to OFF. This needs to be disabled for each recording where you don't want viewers to be able to download the recording.
Setting Playback Range
You can set a playback range to determine the start and end times of when you want the video to play by following these instructions. It will remove sections from the beginning and end that are not needed. However, please note that the playback range does not cut your recording. If you enable recording download, the download file will be the original length, regardless if you set a playback range.
Accessing a recording
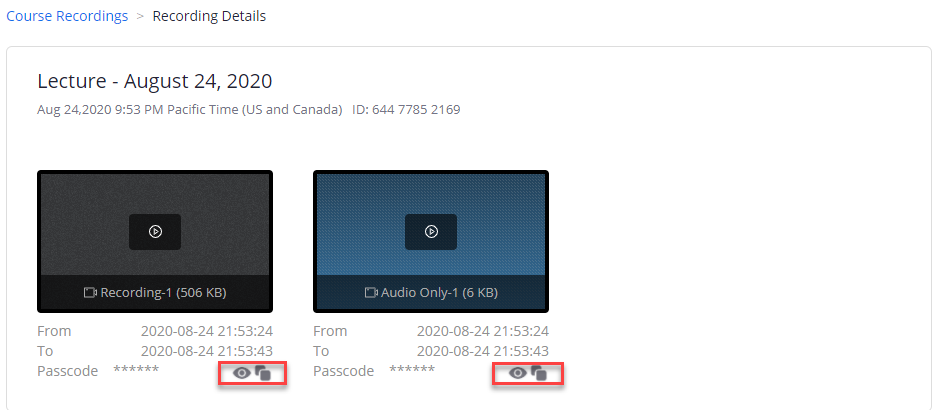
After you published your cloud recording, students can access them in Canvas but a passcode is required. Please note that the passcode required to access cloud recordings is not the same as the passcode used to enter the Zoom meeting. A unique random passcode is created for each recording.
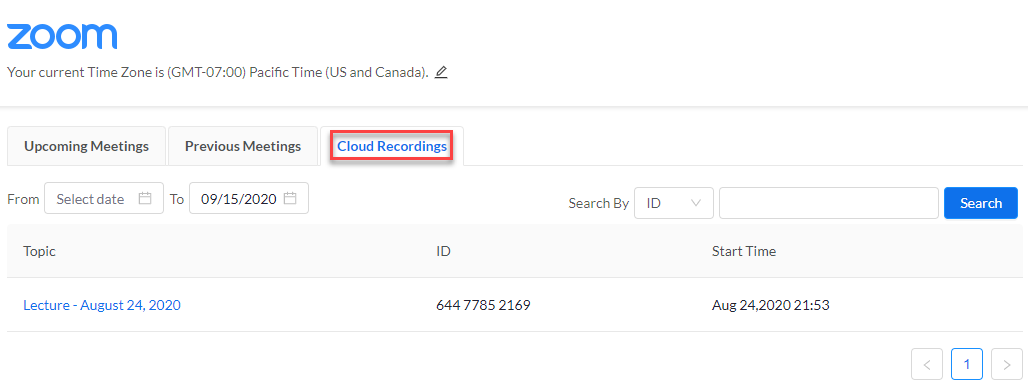
- Click on the Zoom from the course navigation.
- Click on the Cloud Recordings tab and select the recording you want to view..
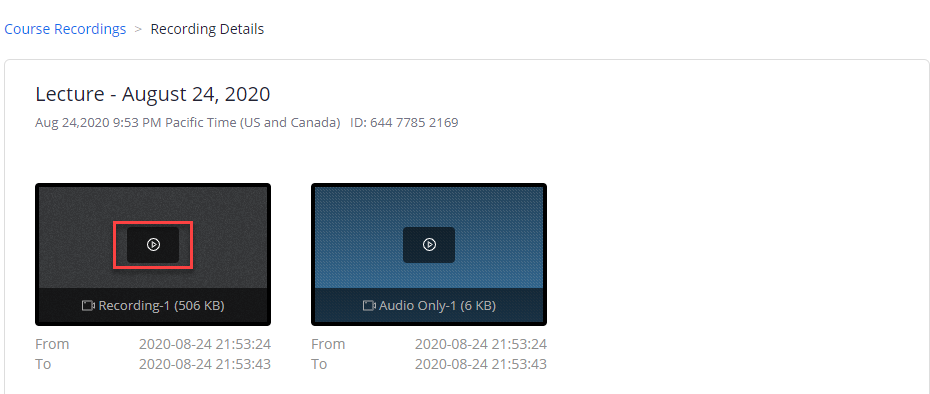
- Click on the play button in the centre of the video thumbnail. It will open the video in a new browser tab which will ask students to enter a passcode.
- Students can find the passcode by clicking on the eye icon at the bottom of each recording file.
- The left icon will make the passcode visible – students can copy it to their clipboard.
- The right icon will automatically copy it to their clipboard.
- Paste this passcode into the other browser window. A Captcha screen might appear to prove you are not a robot.
The video will be visible to students. They can also download the recording to their computer, if enabled by the instructor.
General Overview
Zoom supports three types of breakout rooms: manual/automatic, self-select, pre-assigned
- Manual/Automatic
- The host or co-host manually assigns participants to breakout rooms or lets Zoom automatically divide participants into the number of breakout rooms.
- Self-select
- The host or co-host determines the number of breakout rooms and participants can join breakout rooms on their own.
- Pre-assigned
- The host manually pre-assigns participants to breakout rooms, before the meeting has started.
Note: Pre-assigned breakout rooms are not recommended due to the administrative oversight required. Manual/automatic and self-select breakout rooms are the preferred options. If you need to have persistent breakout rooms (e.g. same students in the same rooms every lecture), you can create self-select breakout rooms and ask students to join the same breakout room each time.
Breakout Room Recommendations
For recommendations on how to incorporate breakout rooms into your lectures, please visit our Breakout Rooms: Recoomendations for UBC Science Instructors handout, which covers room assignment, cultures and norms, activities, groups, and student feedback.
Students: How to Join Breakout Rooms
For students who are registered in courses where your instructor is using self-select breakout rooms or pre-assigned breakout rooms, please visit our Zoom: Joining Breakout Rooms (Students) guide.
Requirements
- Both the host and co-hosts can create/manage self-select, manual, and automatic breakout rooms; however, only the host can create pre-assigned breakout rooms.
- Breakout rooms must be enabled and, for pre-assigned breakout rooms, the pre-assignment option must also be selected.
- Up to 100 breakout rooms may be created in a single Zoom session.
- Host and Co-hosts: Zoom desktop client on Windows or macOS, version 5.4.6 or higher.
- Participants: Zoom desktop client or mobile app, version 5.3.0 or higher; web client.
- Note: participants joining through the web browser cannot self select breakout rooms, they must be using the Zoom desktop client.
Specific requirements for pre-assigned breakout rooms:
- Up to 1000 participants can be pre-assigned to breakout rooms. Please note that you will still need to request for the 'large meeting add-on' for Zoom meetings with 300+ participants.
- Participants must have Zoom accounts (both UBC and non-UBC Zoom accounts are valid). Instructors will need to collect the list of students’ Zoom account emails in order to do the pre-assignment.
- When joining a meeting with pre-assignments, participants need to be signed in to their Zoom account for pre-assignments to be applied.
- If you start the meeting from the Linux client or Zoom Mobile App, you will not be able to see your breakout rooms with pre-assigned participants.
Downloading the Most Current Zoom Version:
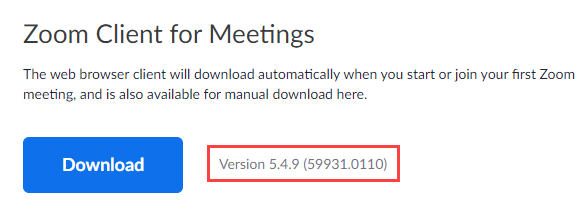
- First, determine which version you currently are on. Sign into your Zoom Desktop Client, click your profile picture, then “Check For Updates”, to determine your version number.
- If your Zoom account isn’t on the latest version, you can download it here: zoom.us/download
- Make sure you see the latest version listed in the download centre.
-
Click Download and install.
Creating Breakout Rooms
- Click Breakout Rooms from bottom menu
- Choose the desired number of breakout rooms you want to create from the drop down. Select either Assign automatically, Assign manually, or Let Participants choose Room (self select).
Then click Create.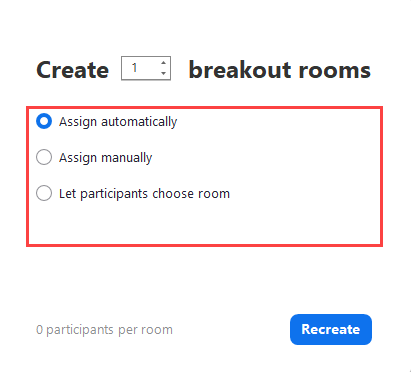
- Once created, click on Options to ensure the settings are set up correctly, then click Open All Rooms .
- Make sure you have “Allow participants to choose room” selected for self-select breakout rooms.
- Select “Automatically move all assigned participants into breakout rooms” to move all participants into rooms automatically. Leaving it unchecked means participants will need to check “Join” to be added to the breakout room.
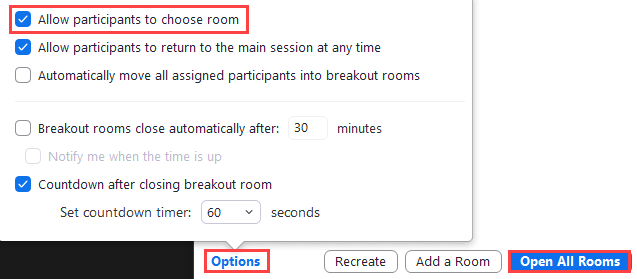

Note : You can also rename breakout rooms by hovering over the rooms and clicking on Rename .
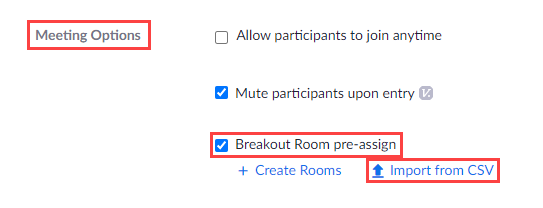
Pre-assigned rooms must be set up from the Zoom web portal.
- Sign in to the Zoom web portal https://ubc.zoom.us/signin.
- Click Meetings and schedule a new meeting or hover over an existing upcoming meeting and click Edit.
- In the Meeting Options, select Breakout rooms pre-assign and click Import from CSV.
- Click download to download a CSV file template to fill out.;
- Open the CSV file with Microsoft Excel, or another spreadsheet software.
- Fill in the Pre-assign Room Name column with the breakout room name, and the Email Address column with the email of the participant assigned to that room.
- Save the updated file as a CSV.
- Drag and drop the file into the web portal.
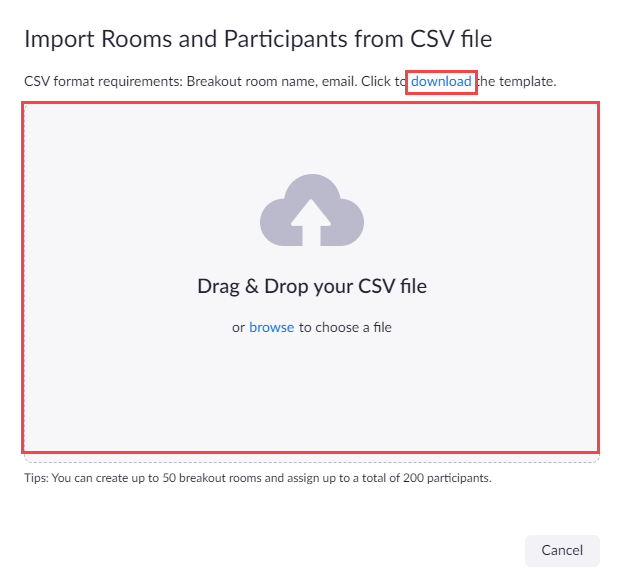
- Confirm that the participants have been pre-assigned to the breakout rooms, and click Save.
Opening pre-assigned breakout rooms during a Zoom session:
- Once the meeting is in session, open breakout rooms from the bottom menu.

- The pre-assigned breakout rooms will appear automatically with the participants pre-assigned in their rooms (of those who are present in the Zoom session).
- Click Open All Rooms to start the breakout rooms.
Moving between Breakout rooms:
After the Host has opened all rooms, a Join a breakout room pop-up will appear at the bottom. The “Breakout Rooms” option will also appear for the participants.
If the option Allow participants to choose room was selected in the breakout room options before starting breakout rooms, then participants will be able move freely between breakout rooms. Note that if you created Manual/Automatic or Pre-assigned breakout rooms and you don't want participants to be able to move freely between rooms, make sure this option is un-selected before opening the rooms.
- Click Breakout Rooms.
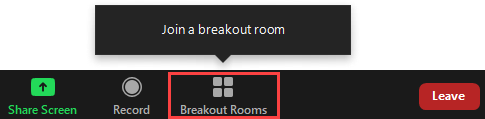
For Windows users, click Join > Yes beside the room you would like to join.
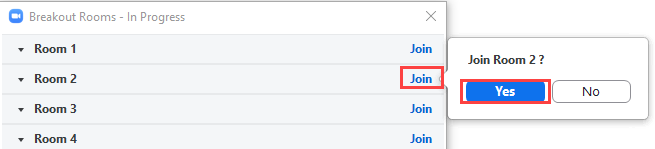
For Mac users, hover over the number beside the Room you want to join. Click Join > Yes to join the room.

- You will be sent to the breakout room you chose to join. To change rooms, click on Breakout Rooms > Choose Breakout Room.

Note: The "Ask for Help"option from Meeting Controls, as seen from the picture above, can be used for student feedback. Students who click on this option can invite the Host to join their breakout room for assistance. However, only the Host will be notified; the Co-Host cannot see this notification.
General Overview
The polling feature in Zoom allows you create and launch poll/quiz questions during your Zoom lectures. You can choose to create the polls before or during the Zoom lecture, and export the polls results after the lecture.
Note: By default, only Hosts can create and edit Zoom polls. If you would like your TAs to add/edit polls, log in to your account at https://zoom.us/, then go to Profile > Settings and toggle on the “Allow alternative host to add or edit polls and quizzes” option.
Creating Zoom Polls
- Go to https://zoom.us/meeting and sign in, if you haven’t already.
- Click the meeting you wish to add a poll to. If you have not scheduled a meeting, you can follow the instructions on the Scheduling a Meeting section.
- Scroll to the bottom of the meeting details page and click +Create under the Polls/Quizzes section to create a poll.
- Select the poll type (Polls or Advanced Polls and Quizzing) and set the poll details.
- Prepare a CSV file of the poll questions you would like to add.
- Go to your course in Canvas and click on Zoom from the Course Navigation menu.
- Click the meeting you wish to add a poll to. If you have not scheduled a meeting, you can follow the instructions on the Scheduling a Meeting section.
- Scroll to the bottom of the meeting details page and click Insert CSV.
- You can also download the CSV template here.
- Select the CSV file containing the poll questions.
- NOTE: Do not use Safari when uploading the CSV file onto Canvas. Safari will block the cookies/caches needed to import the CSV file. You can use browsers such as Chrome and Microsoft Edge instead.
- Click the Polling icon on your Meeting Controls.
- Click Add a Question.
- Select the poll type (Polls or Advanced Polls and Quizzing) and set the poll options.
NOTE: The default polls feature includes only multiple-choice questions. You can enable the “Advanced Polls and Quizzing” option in the Zoom web portal to choose from a greater variety of question types. You can learn more about advanced polling here. However, advanced polls are not supported when creating polls ahead of time through Canvas.
Launching Zoom Polls
- In your Zoom meeting, click on the Polling icon on your meeting controls.
- In your active session, click the Polling icon at the bottom of the screen.
- Select the poll you would like to launch from the drop-down at the top. (This drop-down will only appear if you have more than one poll.)
- Click Launch Poll.
- Students will be prompted to answer the question and you will be able to see the results as they come in. Click End Poll to stop collecting responses.
- If you would like to share the results with students, click Share Results. When you are done, click Stop Sharing.
Exporting Zoom Poll Results
- Go to https://zoom.us/account/report and sign in, if you haven’t already.
- Go to the Usage Reports tab and click on Meeting.
- Choose Poll Report, select the desired date range and click “Search”.
- A list of meetings will be generated on the page. Search for the desired meeting and click on Generate on the last column.
- Zoom will redirect you to the Report Queues tab where you can Download the report as a CSV file.
Zoom bombing is a practice where unwanted, disruptive intruders hijack the session with the insertion of inappropriate content, which can be posted online to video sharing platforms. The compromised Zoom session can typically be shut down by the host.
To prevent Zoom bombings, use the following best practices:
- By enabling only authenticated users to join your meeting, students will have to sign up and create a Zoom account at https://ubc.zoom.us/ . This will prevent any anonymous users without a Zoom account to join.
- To enable this feature, go to the meeting settings and make the Zoom session only available to authenticated users.
- For larger meetings, you can enable registration which will require students to register for the meeting with their name and email address.
- To enable this feature, go to the meeting settings and check “Required” next to Registration.
- Share your meeting links within your course and avoid sharing it on social media or websites that are publicly available. Unless the Waiting Room is enabled, anyone with your meeting link will be able to join your meeting.
- If the “waiting room” feature is used, students will stay in the “waiting room” until the host/co-host(s) admits them to the main room. The Host and Co-hosts can click on Participants to see a list of students in the main room as well as the students in the waiting room. This enables you to check for student identification before admitting them to the main room.
- Your PMI is a persistent meeting room and people can pop in and out at any time; it is the Zoom equivalent of a unique email address. Anyone who has your PMI can join any meeting you run using your PMI. Instead, schedule recurring lectures for your courses.
- To learn more about the PMI, please visit this link.
- Zoom bombers may change their usernames to protect their identities. To prevent this, sign into your account at https://zoom.us/signin and go into “Settings.” Scroll down to look for the option “Allow participants to rename themselves” and toggle off the option.
Manage screen sharing
- You can restrict screen sharing to Host only (enabled by default), and only enable participants to share screen when needed.
- You can check this during a live session by clicking on the arrow next to Share Screen / Advanced Sharing Options and make sure the option Host Only is checked.
- To enable specific participants to share their screen, you can promote them to a Co-host. Click on Manage Participants in the meeting controls at the bottom of the Zoom window. Hover over the name of the participant who is going to be a co-host, and click More > Make Co-Host
- You can disable the annotations feature if not needed. When sharing your screen during a live class, participants can annotate the screen.
- To disable this feature, go to the screen share menu at the top of your meeting screen, click More and select Disable Attendee Annotation in the drop-down menu.
Manage participants
- Enable the waiting room.
- After enabling the waiting room feature, you can match the students’ names in the waiting room with your class list to verify their identity then click Admit to admit students individually, or you can simply click Admit All to admit everyone at once.
- Lock the meeting
- This option prevents students who arrive late from joining the zoom session. If you would like to enable this, from inside the zoom session click on Participants and click the button that says Lock Meeting.
- Remove unwanted or disruptive participants.
- You can remove participants by clicking Participants then hovering your mouse over a participant’s name and selecting Remove. Once removed, the participant will no longer be able to rejoin the meeting.
- Mute participants.
- You can mute/unmute individual participants or all of them at once if you would like to block unwanted, distracting or inappropriate noise from other participants. You can also enable Mute Upon Entry in your Zoom meeting settings. To disable the option for participants to unmute themselves, you can click Security, then under Allow Participants to: deselect Unmute Themselves.
- Disable video for public events.
- Hosts can turn participants’ videos off to block unwanted, distracting, or inappropriate gestures on video. If you would like to disable video for an individual participant whose video is currently on, click Participants, hover over the participant and click More, then click Stop Video. To disable video for all participants, you can click Security, then under Allow Participants to: deselect Start Video.
- Stop all participant activity.
- If something goes wrong, you can opt to stop all participant activity by clicking on the Security icon at the top of the screen, and selecting Suspend Participant Activities. This action will lock the meeting and stop all participants from using video, audio and screen-sharing
Note: The Host and Co-hosts have the option to report participants; however, this option reports the participant to Zoom, not UBC, therefore if you would like to report a participant, it is recommended to do so by directly contacting UBC (see section “After a Meeting”) instead of using the report button (found by clicking “More” next to a participant’s name)
- Allow removed participants to rejoin:
- Sign into your account at https://zoom.us/signin and go into “Settings.” Scroll down to look for the option “Allow removed participants to rejoin” and toggle on the option.
- Note: This will apply to all removed participants, so if you’d only like one or a few to rejoin, you would have to remove the others if they rejoin.
- Contact UBC:
- If you experience Zoom bombing, report the incident to the Cybersecurity team at security@ubc.ca and Zoom Support.
Zoom can be set-up for the purpose of invigilating online exams in real-time. There are specific settings that should be enabled/disabled for the Zoom meeting if it is used for invigilation purposes as opposed to an online lecture.
To learn more about using Zoom for exam invigilation, please refer to the Using Zoom for Exam Invigilation guide.
- There are several reasons as to why this may occur. First, ensure that your Zoom account is a UBC-created Zoom account. (Note: Zoom accounts created using a UBC affiliated email address can still be basic Zoom accounts if you signed up for a free account by going to https://zoom.us/). UBC Zoom accounts are under UBC’s license and must be created by UBC AV (av.helpdesk@ubc.ca). Please visit our Zoom guide and refer to the section Request a UBC Zoom account for instructions on obtaining a UBC Zoom account if needed.
If you have a UBC Zoom account and still get the error message, you will need to ensure that your default email address on Canvas matches the email address used to create your UBC Zoom account. Follow these instructions to change your default email address to match the email address affiliated with your UBC Zoom account.
- TAs will need UBC Zoom accounts if they want to create meetings or are the alternative hosts for meetings through Zoom on Canvas. TAs can follow the instructions in our Zoom guide under the section Request a UBC Zoom account.
- First, ensure your recorded recording is published.
- Click on the Zoom link on the Course Navigation menu of your Canvas course page.
- Click on the Cloud Recordings tab to see all your lectures recorded using Zoom through Canvas.
- Toggle the Publish setting to publish your recording (the toggle button should be blue once the recording is published).
- Click on the Zoom link on the Course Navigation menu of your Canvas course page.
- Click on the Cloud Recordings tab to see all your lectures recorded using Zoom through Canvas.
- Click on the desired lecture, then click on the Share button. A pop-up will show the password for the recorded lecture.
- The standard UBC Zoom account can support up to 300 participants. If your course has between 300 and 1000 students, you can request for a 500- or 1000- large meeting add-on. With a large meeting add-on, you still have the same functionalities available in standard meetings. To request for a large meeting add-on, please submit a request to av.helpdesk@ubc.ca.
- A Personal Meeting ID (PMI) is unique to your account. It is the Zoom equivalent of your email address. Anyone who has your PMI can join any meeting you run using your PMI. We do not recommend using your PMI for lectures. Instead, schedule recurring lectures for your courses.To learn more about the PMI, please visit this link.
- Recurring meetings allow you to schedule meetings with multiple occurrences, with each occurrence using the same meeting ID and settings. This creates a simpler display for instructors and students. To create a recurring meeting, follow these steps.
Individual meetings are recommended when they’re needed for one or two occurrences, such as scheduling individual student meetings or one-off office hours. To create an individual meeting, please follow these steps.
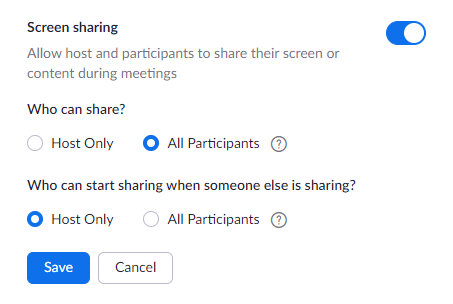
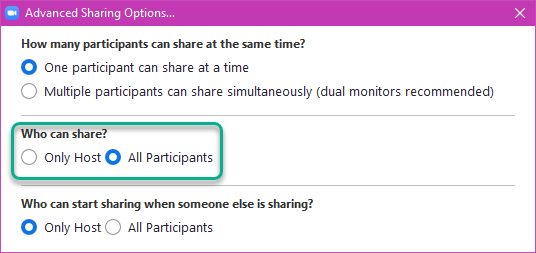
- In order for participants of a Zoom meeting to share their screens, the host needs to enable the setting. Sign into the Zoom web portal, then navigate to the Settings tab. Find the settings for Screen sharing, as displayed in the image below. Toggle the button to On (it will become blue as shown in the image) to enable screen sharing. Under Who can share select All Participants to allow students to share their screens. These settings will be applied to all Zoom meetings you create until you change them.
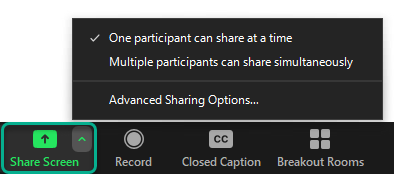
As long as screen sharing is enabled in the global settings on the Zoom web portal, you can change the settings of who can share during your Zoom meeting. On the bottom toolbar of your Zoom meeting interface, click on the Share Screen button. Click on Advanced Options, then select All Participants under Who can share in the pop-up window (please refer to the images below).
- If your pre-assigned breakout rooms aren’t working, it’s possible that some of the requirements are not met.
Students must have a Zoom account in order to be pre-assigned to a breakout room. Ensure that your students all have a Zoom account (they do not have to be UBC Zoom accounts) and that the email they provide to you is the same email associated with their Zoom account. Also, ensure that your students have downloaded the Zoom desktop client, as they cannot join pre-assigned breakout rooms using Zoom through a web browser. Students must be logged into the desktop client prior to joining a Zoom meeting in order for them to be automatically put into the pre-assigned breakout room.
If these conditions are met and you are still experiencing issues, it is possible that students are on an older version of Zoom. Students joining the meeting must be on version 5.3 or later. This can be an issue for students using Chromebooks, as Chromebooks do not support Zoom versions newer than 5.0.
For more information on breakout rooms, please visit Zoom's pre-assigned breakout rooms guide and Skylight’s joining pre-assigned breakout rooms guide for students.
- The longer a Zoom recording is, the longer it will take to process. In general, recordings saved to your computer (locally) process much faster than recordings saved to the cloud. A large Zoom recording saved locally may take a few seconds to a few minutes to process. A large Zoom recording saved to the Cloud can take twice as long as the recording’s length to process. In times of higher demand for Zoom recordings, the processing time for Zoom Cloud recordings is predicted to take up to 24 to 72 hours.
- If your Zoom recordings are stored locally and you would like to post the recordings on Canvas, you should upload your recordings to the Canvas Media Gallery (Kaltura). Refer to the Kaltura guide for instructions. Do not upload videos to the Canvas Files area as that will take up your course quota.
Kaltura has its own storage space for media so uploading your videos to this platform will not take up your course quota, which should be used for course content.
- Unwanted Zoom recordings that are recorded locally to your computer can be deleted from the computer directly.
Cloud recordings can be deleted through the Zoom web portal.
- Sign in to the Zoom web portal, select Recordings.
- Click the Cloud Recordings tab and select the recording you want to delete.
- A new page will then open, click on the trash can icon to the right of the recording file to delete the Cloud recording.
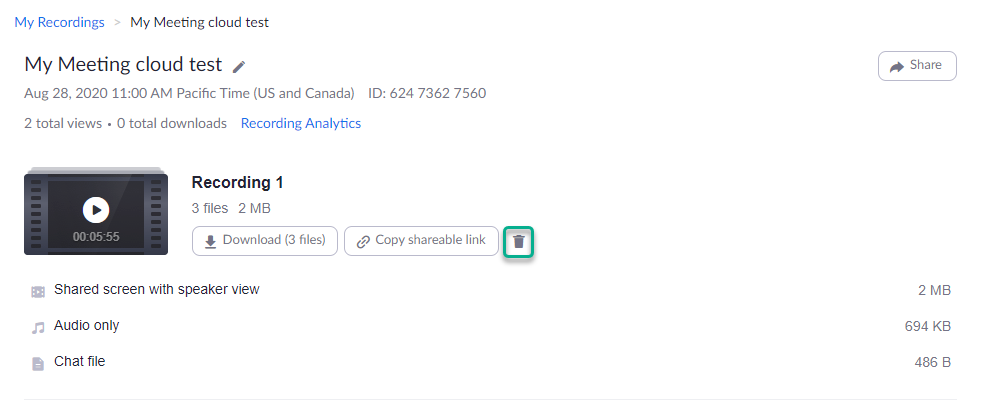
- Click Yes on the confirmation pop-up to delete all files of the recording. If you want to delete only some parts of the recording but not others, such as only deleting the audio, roll over Audio only with your mouse. Another trash can icon will appear which you can click to delete only the recording’s audio.
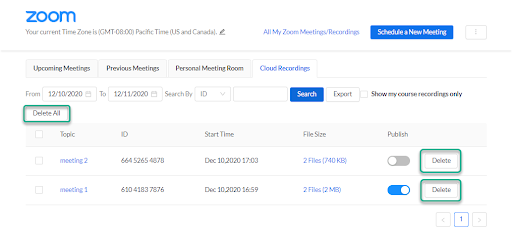
- On Zoom through Canvas, click on the Cloud Recordings tab. Here you can see all the cloud recordings of Zoom meetings created and accessed through Canvas.
- Delete recordings from the list using the Delete buttons next to each recording. You can also click on the check boxes to the left of each recording to delete selected recordings (the button appears once recordings are selected) or delete all recordings using the Delete All button.
- The video recordings are safe in Zoom Cloud. The storage space allocation for Zoom cloud recordings is University-wide, so individually you will not run into space constraints.
- Invigilation of exams may be recorded using cloud recordings only. Local recording is not permitted, as there is no way of confirming that the recording is being stored securely.
Important: Cloud recording is not available in breakout rooms; it is only available in the main room. If you need to record the session then you cannot use breakout rooms during the invigilation. The workaround is to create multiple Zoom meetings (with a TA in each) to break the students into smaller groups in place of using breakout rooms.
- When recording a Zoom session using gallery view, Zoom only records a maximum of 25 participants (the first screen). To workaround this, you can have students hold up their IDs and take screenshots of each page while on gallery view.
Note: When verifying IDs in Zoom, tell students to cover the first four digits of their student number to protect their privacy, especially if you are in a virtual space where other students can see.
- This issue can occur for MacBook users who are using Chrome. To resolve the issue:
- Turn off any ad blockers that they may have for canvas.ubc.ca
- Double check that their cookies settings are set to Allow all cookies or Block third-party cookies in incognito; however, if they would prefer to use the setting Block third-party cookies, they will need to add the following two URLs to the list of Sites that can always use cookies:
- canvas.ubc.ca
- https://applications.zoom.us/
- Clearing the browser's cookie and cache and disabling extensions
- Using a different browser or the browser in private mode
- Using a different device
- You are able to trim your recordings via scissor icons by logging into your Zoom account by using the following link: https://zoom.us/
- From there, click on My Profile.
- Click on the Recordings tab in the menu on the left side of your screen.
- Select the recording you would like to edit and click on the Play button. You can now trim your recording by using the Scissor tool. If your videos are saved on the Zoom cloud, you should be able to access and publish the newly edited version of these recordings through Canvas.
- Your TA may not have a registered UBC Zoom account. To create or register their account, please see Request a UBC Zoom account in this guide and have your TA follow the instructions listed.
- No, unfortunately, it is not possible to import meetings into Canvas. To share your recording, you will either need to download it onto your computer and then upload it into your course through Kaltura (My Media tab) or share the recording link somewhere in your course.
- When students enter their breakout rooms, they will lose access to everything in the main room. However, you can re-share your screen to all breakout rooms by clicking on New Share on the meeting controls and select the Share to breakout rooms option (this feature is available only on v5.7.0 or later). You can also use the Broadcast a message to all feature to remind students of any announcements.
- Please refer to this guide.
Zoom releases updates regularly and the documents below will highlight some of the notable features. For more information on the updates, please refer to Zoom's release notes for Mac and Windows.
- Version 5.4.6 and 5.4.7
- Version 5.4.9 and 5.5.2
- Version 5.6.3 and 5.7.4
- Version 5.8.0
- Version 5.8.3 and 5.9.0
- Version 5.9.3 and 5.9.6
Last updated on: April 7, 2022
Learning technology support
If you have any questions or if you would like to report an issue regarding a learning technology, please don’t hesitate to contact us at LT.support@science.ubc.ca. For in-person support, please join our LTRs at one of our drop-in sessions.
