Zoom
Zoom is a video/audio web conferencing and collaboration tool that allows individuals to host meetings and lectures online in real-time. Multiple classroom activities can be done such as sharing audio, video or screen, presenting with a whiteboard, splitting up students into smaller groups for group activities using breakout rooms, and interacting with students via the Chat function. Zoom is available as a desktop application and online, which can be accessed via laptops and mobile devices.
Key Features
- Supports multiple functions in real-time: host lectures, office hours, group discussions, student presentations, and invigilation of exams
- Records meetings and download transcripts: record meetings and lectures and download their transcripts
- Flexible access: join Zoom from a mobile device, laptop, and other device using the app
- Large meetings: host up to 300 individuals (by default) in a meeting
- Screen share: share screen to allow students to see lecture notes or other content
- Whiteboard: write and share material during class on the whiteboard and allow students to collaboratively contribute to the class
- Breakout rooms: separate a class into smaller groups for class activities and discussion
- Remote control: request participant remote control during screen sharing
- Chat function: ask and respond to questions and share files and links with everybody or privately in the chat
- Polls: run polls for quick surveys during a meeting or for testing student understanding of content during a lecture
To learn about the different features available in Zoom’s desktop application and webinar, visit our Zoom Features page.
Getting Started
Before you can start using Zoom, you will need to request for a UBC Zoom account.
Please ensure that the email address associated with your Canvas account is the same as the email for your UBC Zoom account. If there are multiple email addresses in your Canvas account, you will need to set the default email address to the same one as Zoom. To do this, follow the guide for changing your default email address in Canvas.
Note: TAs should use a UBC affiliated email accounts (i.e. @ubc.ca, @student.ubc.ca, @cs.ubc.ca, etc.) when requesting a Zoom account.
Instructions
Schedule Zoom meetings in Canvas
You can add Zoom in the Course Navigation of Canvas for easy access and schedule various types of meetings.
Note: If you see a Warning message with an error code (as shown below), you need to ensure the email address associated with your Canvas account is the same as the one used for your UBC Zoom account.

If you scheduled meetings through the Zoom desktop application or the web portal (https://zoom.us/ > Meetings), those meetings will appear under All My Zoom Meetings/Recordings. However, these meetings will not be visible to students. Only meetings scheduled through Canvas (located under Course Meetings/Recordings) will be visible to students when they click on the Zoom link from the course navigation menu.
Run and Record a Meeting
Before recording your sessions, check your local recording or cloud recording settings first. In addition, review the different recording layouts available depending on the video layout of your meeting.
Closed captioning for Zoom
You can add real-time closed captioning during a Zoom session by using the closed-captioning tool for Zoom.
Note: You will be required to log in with your CWL.
Record an in-person lecture
You can record an in-person lecture using Zoom and publish it later for students to access.
Download Zoom Recordings
You can download the recordings of Zoom meetings that you have recorded.
Disable download for viewers
By default, students can download Zoom recordings. You can disable download by following instructions:
- Log into your Zoom account in the web portal and click on Recordings.
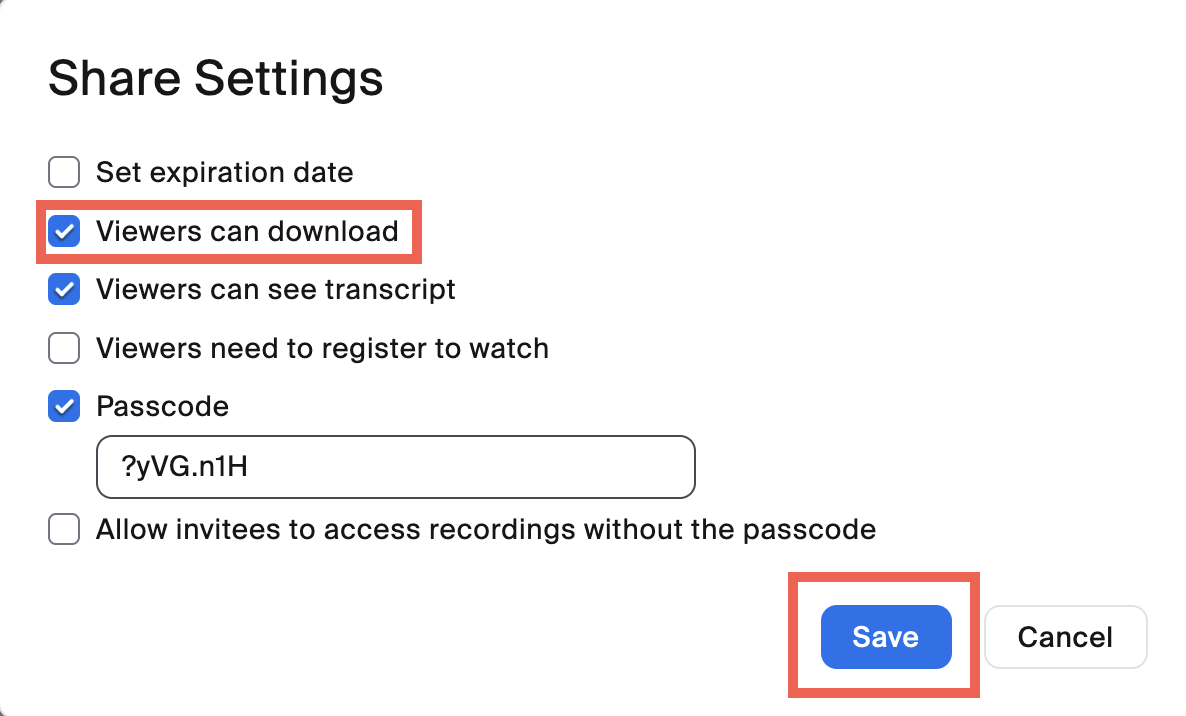
- Look for your recording, click on Share in the upper right corner and click on Share Settings in the window that appears.
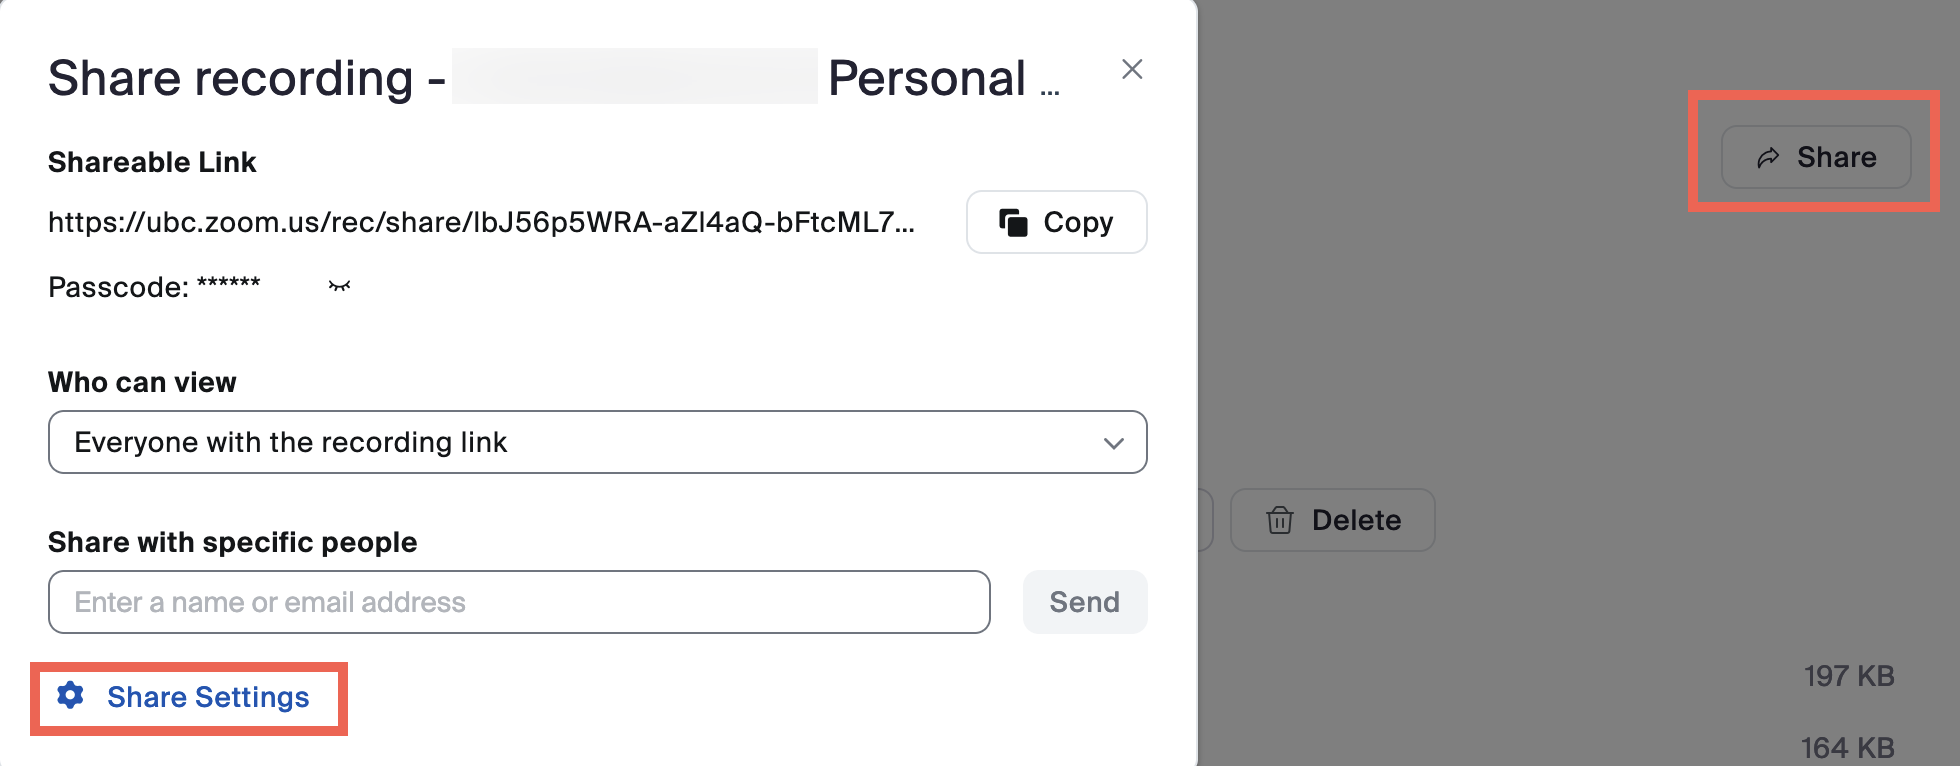
- Deselect the option Viewers can download and click on “Save”. This needs to be disabled for each recording where you don't want viewers to be able to download the recording.
Trim cloud recordings
You can trim a cloud recording by setting a range to determine the start and end times of when you want the video to play. It will remove sections from the beginning and end that you do not need. However, please note that the playback range does not cut your recording. If you enable recording download, the downloaded file will be the original length, regardless of whether or not you set a playback range.
Download transcripts from cloud recordings
After you have enabled audio transcription for cloud recordings in Zoom, you can download audio transcripts from meetings that you have recorded to the cloud.
Publish Zoom Recordings
For Local Recordings, after you have downloaded the recording from Zoom, you can upload it to your Canvas course using My Media/Media Upload.
- After you have stopped recording and ended the Zoom meeting, the Zoom recording will be converted to an mp4 file and automatically saved onto your computer. You can locate the recording under your personal computer’s file directory, under Documents > Zoom folder directory.
- If Zoom was unable to convert your recording into an mp4, you can manually convert the recording by locating the desired recording under your Documents > Zoom folder directory, and double-click on a file that starts with “double_click”.
- Follow the instructions to upload the video to Canvas using Kaltura.
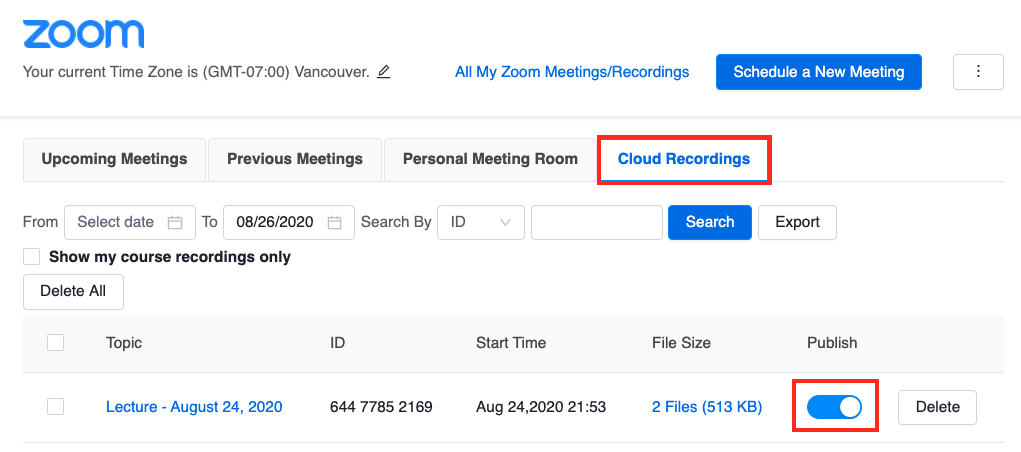
For Cloud Recordings, you will need to publish the recording on Canvas:
- Click on Zoom from the course navigation.
- Click on the Cloud Recordings tab.
- Beside the recording you want to publish, toggle the Publish button to ON, as shown in the image below. When the button is blue, that indicates that the recording has been published and is visible to students.
Access a cloud recording
After you publish your cloud recording, students can access them in Canvas, but a passcode is required.
Note: The passcode required to access cloud recordings is not the same as the passcode used to enter the Zoom meeting. A unique random passcode is created for each recording.
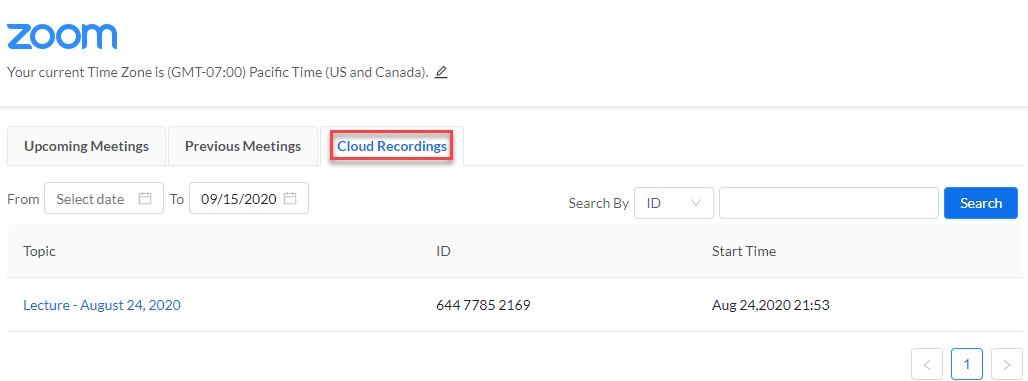
- Click on the Zoom from the course navigation.
- Click on the Cloud Recordings tab and select the recording you want to view.
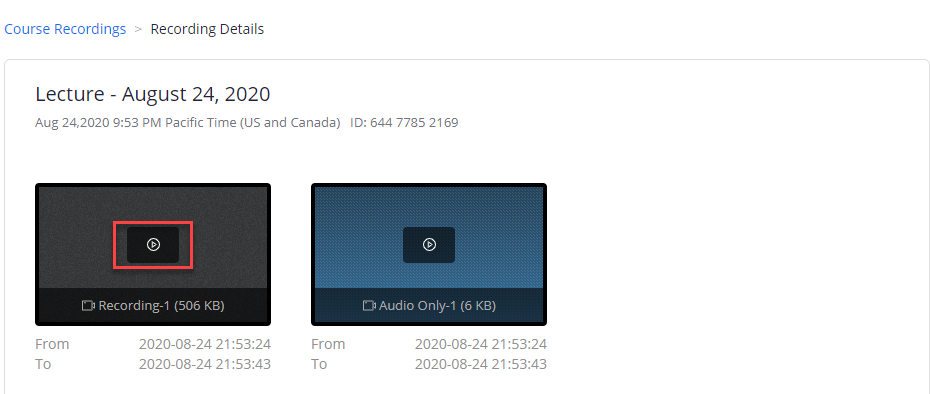
- Click on the play button in the centre of the video thumbnail. It will open the video in a new browser tab which will ask students to enter a passcode.
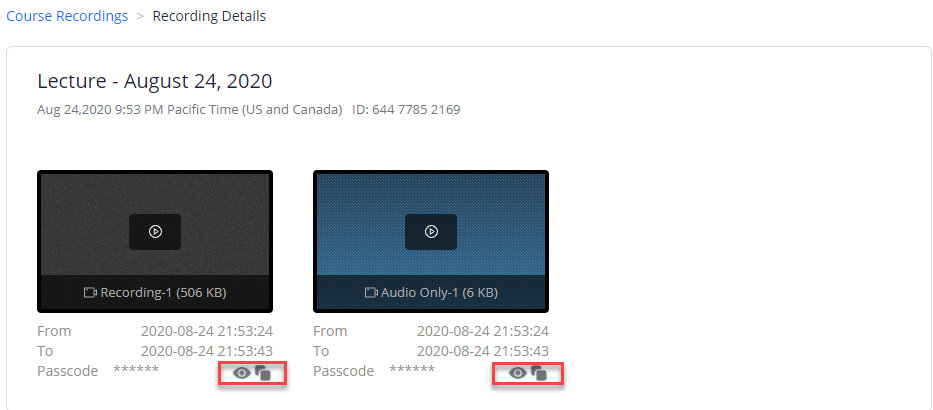
- Students can find the passcode by clicking on the eye icon in the bottom right corner of each recording file.
- The left icon(eye icon) will make the passcode visible – students can copy it to their clipboard.
- The right icon will automatically copy it to their clipboard.
- Paste this passcode into the other browser window. A Captcha screen might appear to prove you are not a robot.
Set Up Breakout Rooms
General Overview
Zoom supports three types of breakout rooms: manual/automatic, self-select, pre-assigned
- Manual/Automatic: The host or co-host manually assigns participants to breakout rooms or lets Zoom automatically divide participants into the number of breakout rooms.
- Self-select: The host or co-host determines the number of breakout rooms and participants can join breakout rooms on their own.
- Pre-assigned: The host manually pre-assigns participants to breakout rooms, before the meeting has started.
Breakout Room Recommendations
For recommendations on how to incorporate breakout rooms into your lectures, please visit our Breakout Rooms: Recommendations for UBC Science Instructors handout, which covers room assignment, cultures and norms, activities, groups, and student feedback.
Requirements
- Both the host and co-hosts can create/manage self-select, manual, and automatic breakout rooms; however, only the host can create pre-assigned breakout rooms.
- Breakout rooms must be enabled and for pre-assigned breakout rooms, the pre-assignment option must also be selected.
- Up to 100 breakout rooms may be created in a single Zoom session.
- Host and Co-hosts: Zoom desktop client on Windows, macOS, or Linux version 5.15.5 or higher.
- Participants: Zoom desktop client or mobile app, version 5.15.5 or higher; web client.
- Note: Participants joining through the web browser cannot self-select breakout rooms, they must be using the Zoom desktop client.
Specific requirements for pre-assigned breakout rooms:
- Up to 1000 participants can be pre-assigned to breakout rooms. Please note that you will still need to request the 'large meeting add-on' for Zoom meetings with 300+ participants.
- Participants must have Zoom accounts (both UBC and non-UBC Zoom accounts are valid). Instructors will need to collect the students’ Zoom account emails to do the pre-assignment.
- When joining a meeting with pre-assignments, participants need to be signed in to their Zoom account for pre-assignments to be applied.
- If you start the meeting from the Linux client or Zoom Mobile App, you will not be able to see your breakout rooms with pre-assigned participants.
Download the Most Current Zoom Version:
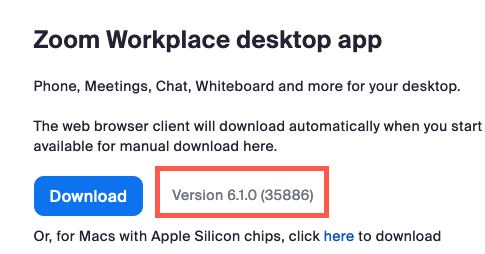
- Determine which version you currently are on. Sign into your Zoom Desktop Client and click on your profile picture.
- Click on “Check For Updates” to determine your version number.
- If your Zoom account isn’t on the latest version, you can download it here: zoom.us/download
- Make sure you see the latest version listed in the download centre.
- Click on Download and install.
Create Breakout Rooms
Pre-assigned Breakout Rooms
Pre-assigned rooms must be set up from the Zoom web portal.
- Sign in to the Zoom web portal https://ubc.zoom.us/signin.
- Click on Meetings and schedule a new meeting or hover over an existing upcoming meeting and click Edit.
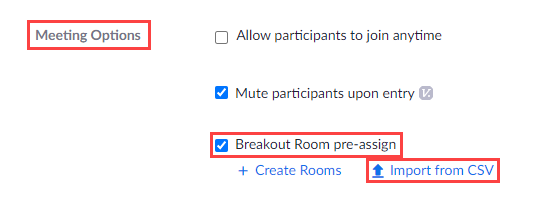
- In the Options, select Breakout Room pre-assign and click on Import from CSV.
- An Import Rooms and Participants from CSV file pop-up window will appear. In the pop-up window, click on Download to download a CSV file template to fill out.
- Open the CSV file with Microsoft Excel or another spreadsheet software.
- Fill in the Pre-assign Room Name column with the breakout room name and the Email Address column with the email of the participant assigned to that room.
- Save the updated file as a CSV.
- Drag and drop the file into the pop-up window.
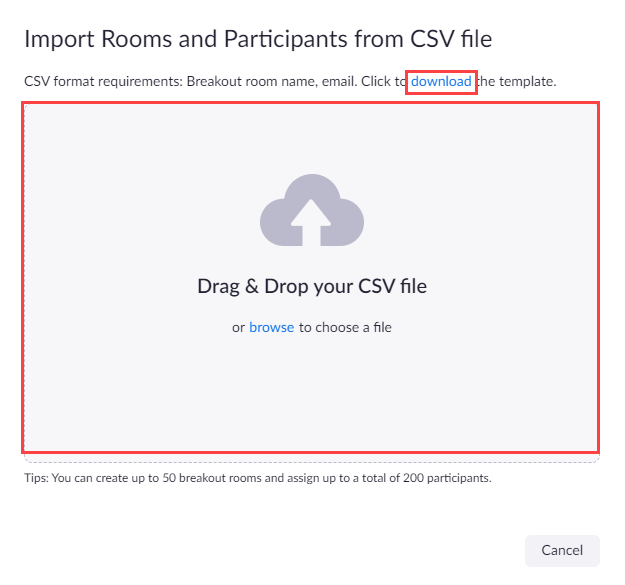
- Confirm that the participants have been pre-assigned to the breakout rooms and click on Save.
Open pre-assigned breakout rooms during a Zoom session
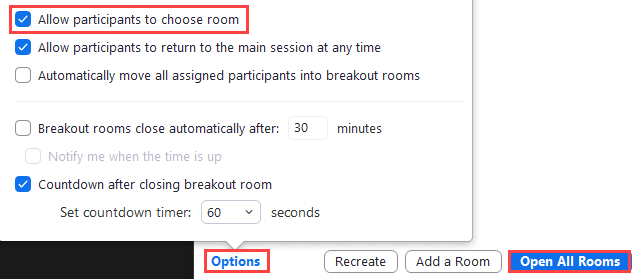
- Once the meeting has started, open breakout rooms by clicking on “Breakout Rooms” in the bottom right.

- The pre-assigned breakout rooms will appear automatically with the participants pre-assigned in their rooms (of those present in the Zoom session).
- Click on Open All Rooms to start the breakout rooms.
Move between breakout rooms
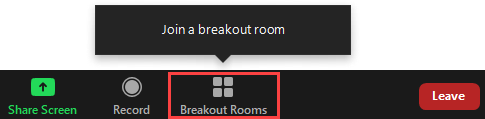
After the host has opened all rooms, a Join a breakout room pop-up will appear at the bottom. The “Breakout Rooms” option will also appear for the participants.
If the option “Allow participants to choose room” was selected in the breakout room options before starting breakout rooms, participants can move freely between breakout rooms.
Note: If you created Manual/Automatic or Pre-assigned breakout rooms and you don't want participants to be able to move freely between rooms, make sure this option is deselected before opening the rooms.
- Click on Breakout Rooms.
- For Windows users, click on Join > Yes beside the room you would like to join.
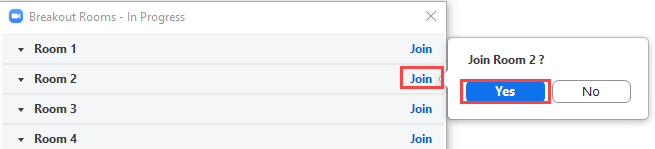
- For Mac users, hover over the number beside the Room you want to join. Click on Join > Yes to join the room.

- You will be sent to thebreakout room you chose to join. To change rooms, click on Breakout Rooms > Choose Breakout Room.

Set Up Zoom Polls
The polling feature in Zoom allows you create and launch poll/quiz questions during your Zoom lectures. You can choose to create the polls before (using the Zoom web portal or Canvas) or during the Zoom lecture, and export the polls results after the lecture.
By default, only hosts can create and edit Zoom polls. If you would like your TAs to add/edit polls:
- Log in to your account at https://zoom.us/.
- Click on Settings in the left-hand navigation.
- In Meeting (Basic), select the “Allow alternative host to add or edit polls and quizzes” option.
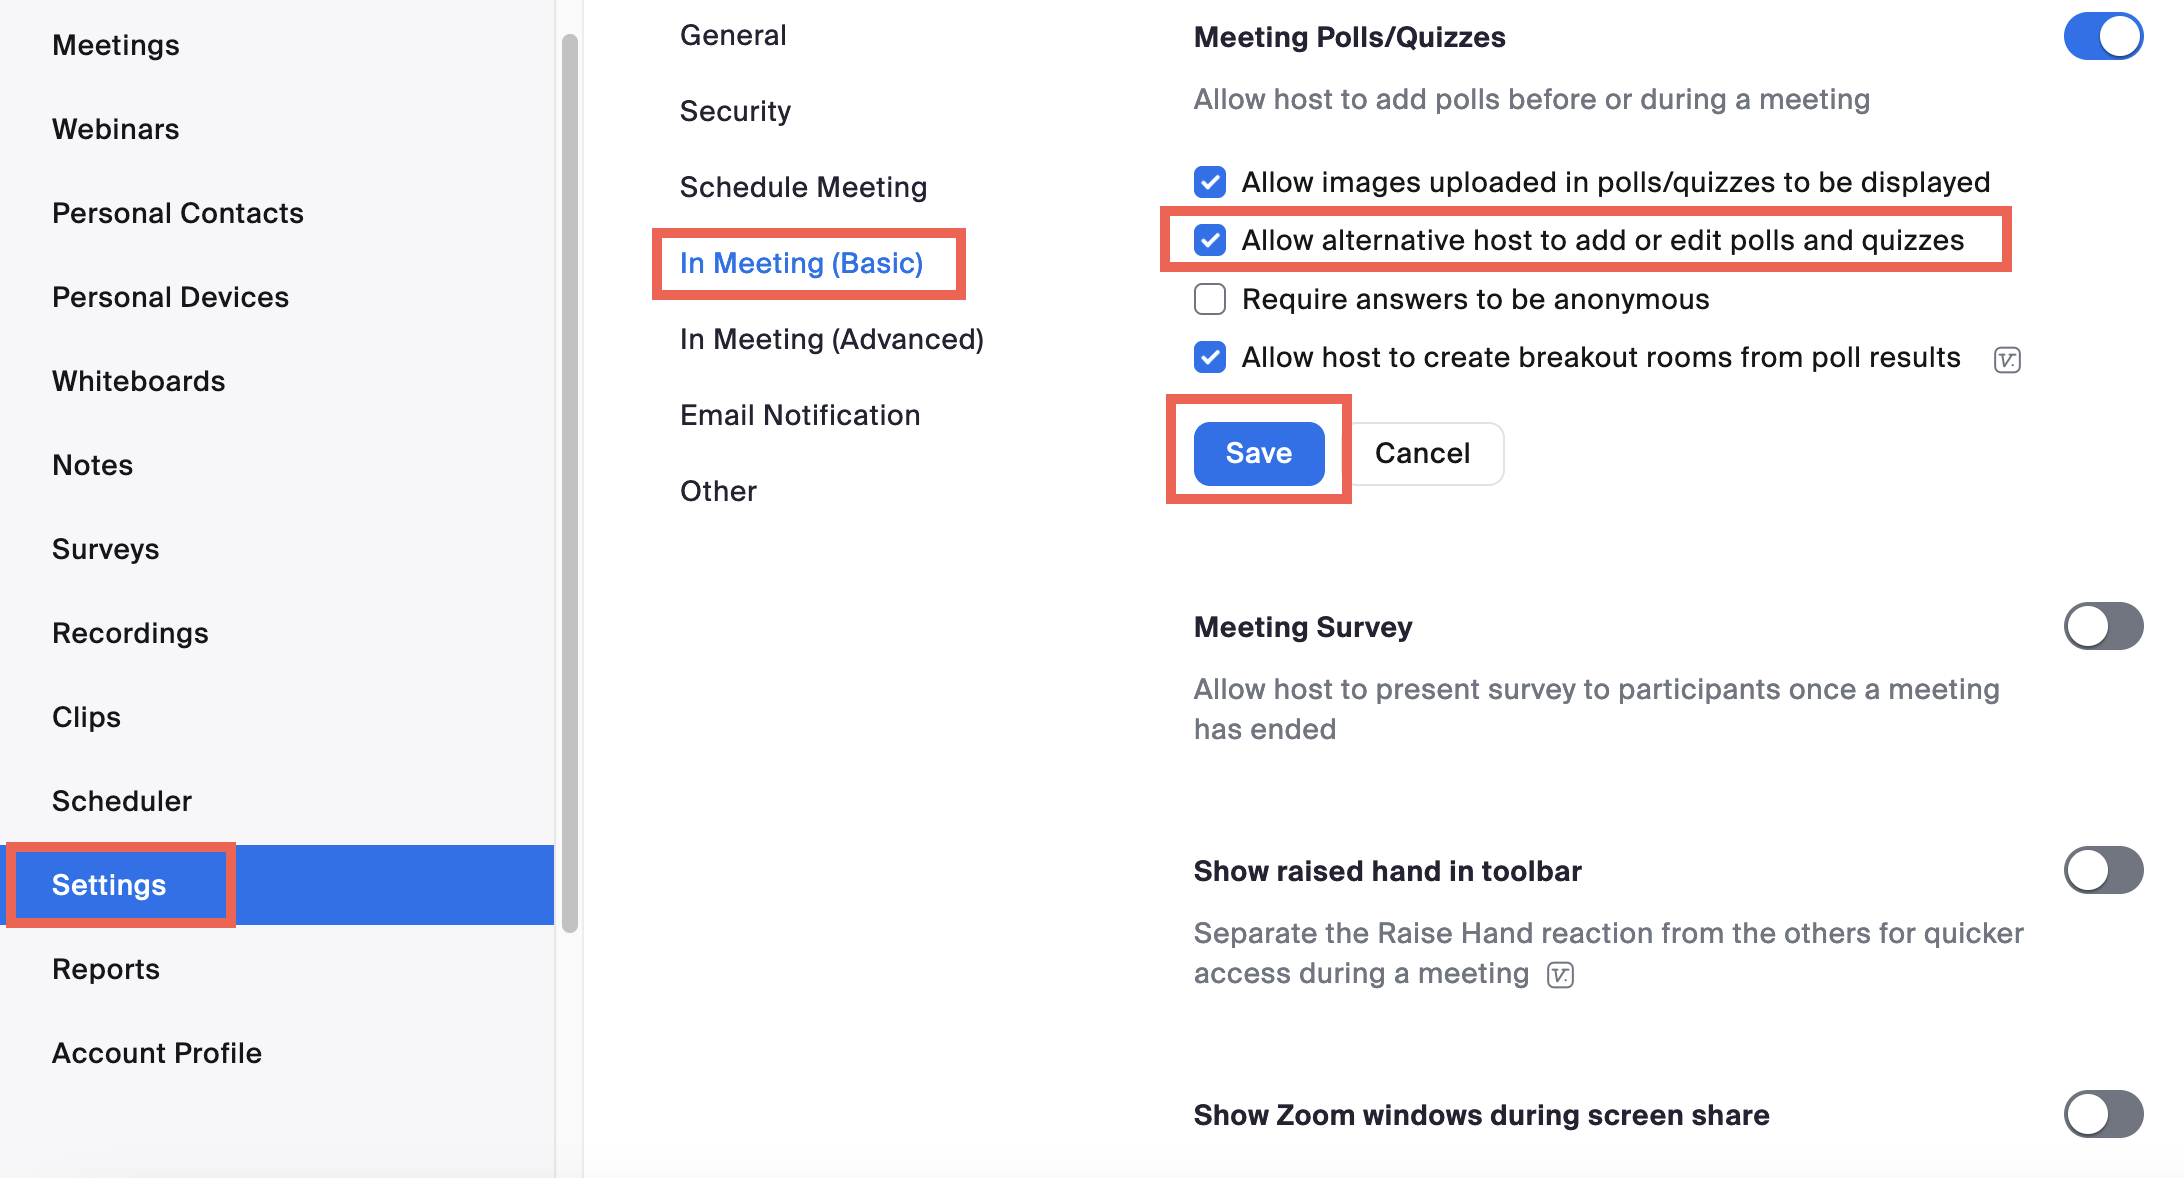
Click on “Save” to save the changes.
Create Zoom Polls
Create polls ahead of time through Canvas
- Prepare a CSV file of the poll questions you would like to add.
- Go to your course in Canvas and click on Zoom from the Course Navigation menu.
- Click on the meeting you wish to add a poll to. If you have not scheduled a meeting, you can follow the instructions in Add Zoom to Canvas and schedule meetings with Zoom.
- Scroll to the bottom of the meeting details page until you reach the section Poll and click on Import CSV.
- You can also download the CSV template here.

- Select the CSV file containing the poll questions.
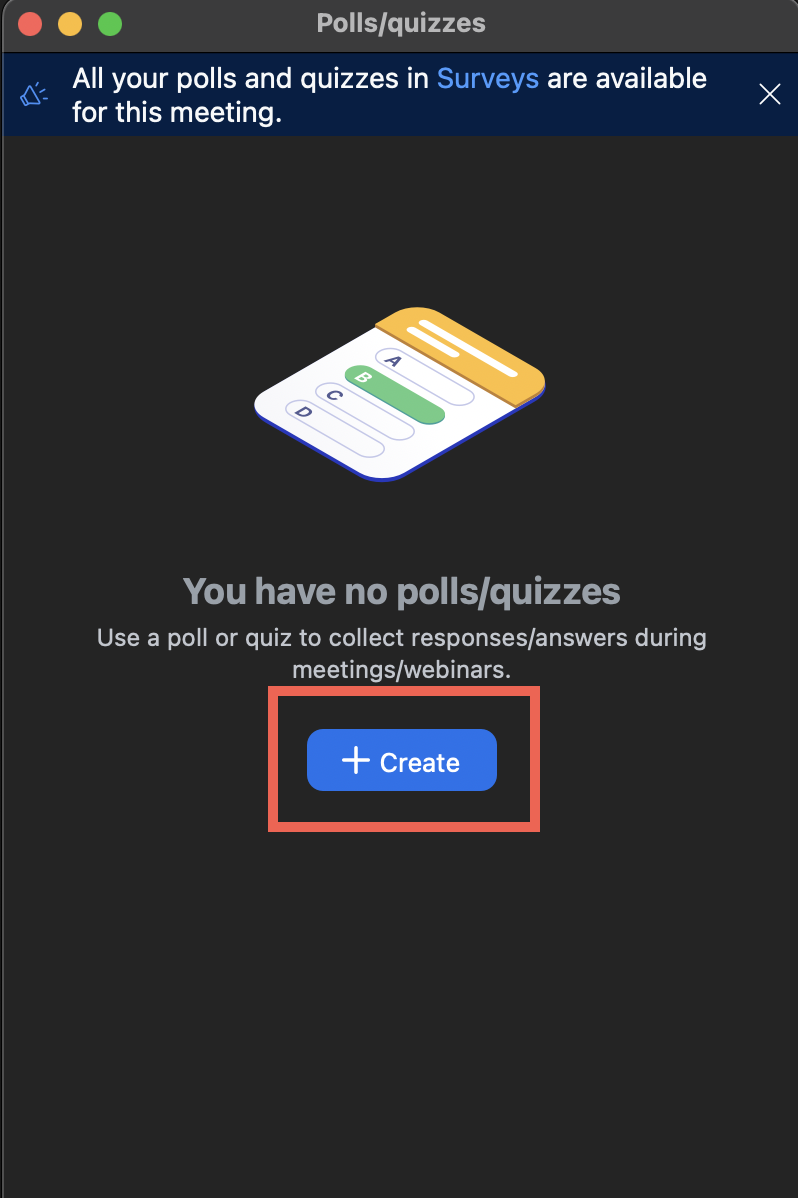
Create polls during a Zoom meeting
- Click on the Polls/quizzes icon in your Meeting Controls.

- A pop-up window will appear. Click on the blue button +Create.
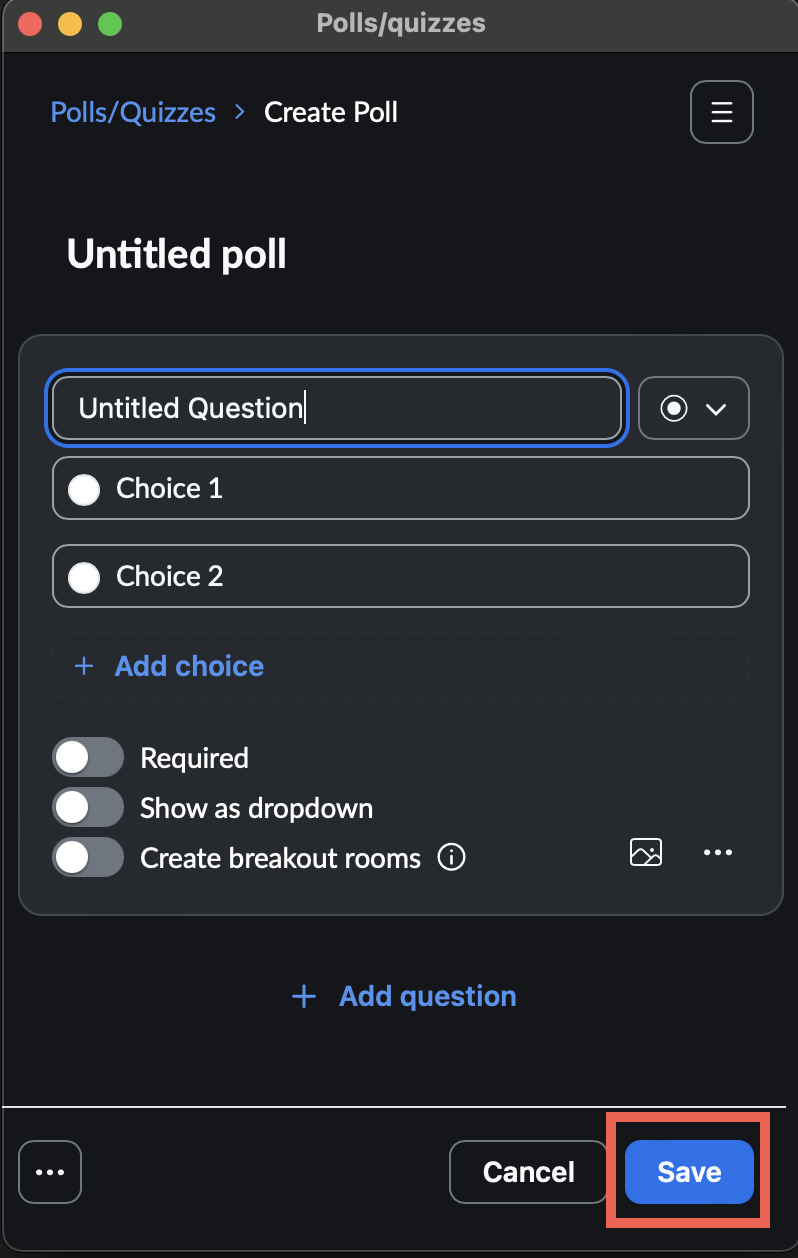
Click on the title Untitled poll and change the title.
Click on Untitled Question to set a question.
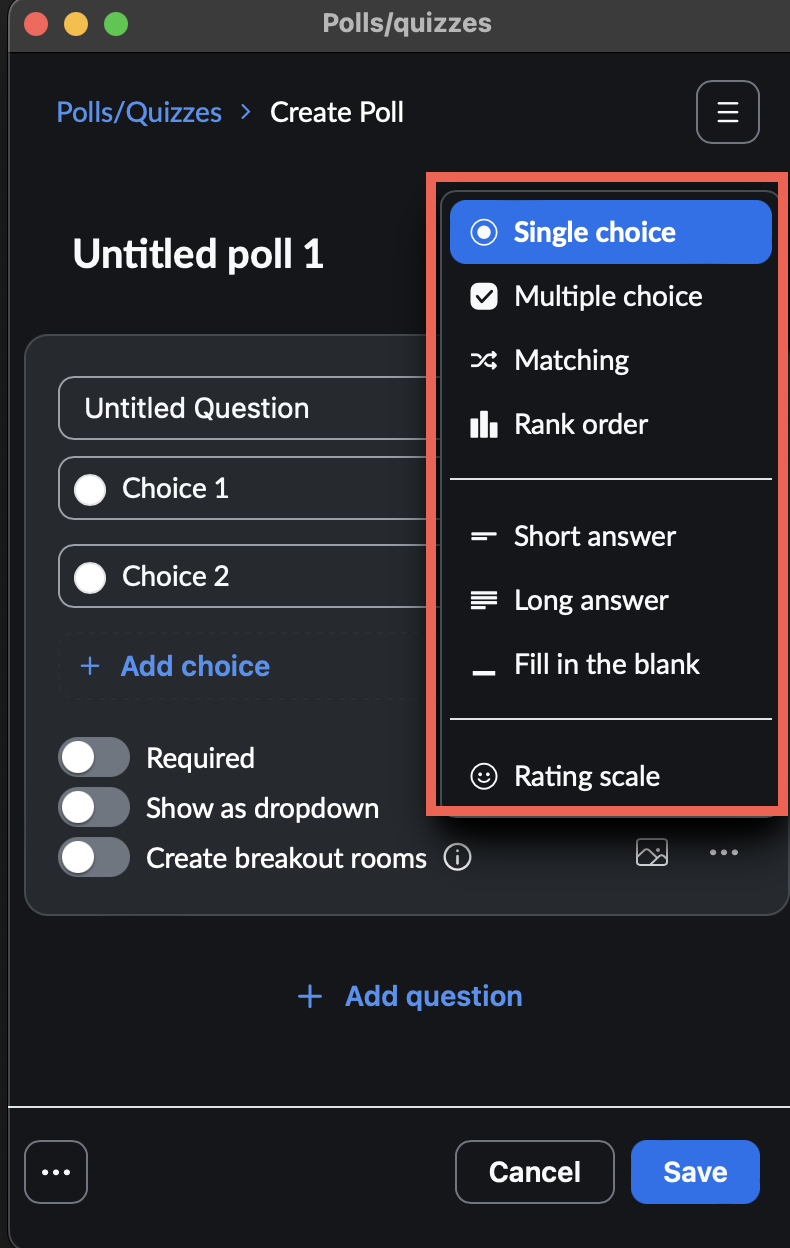
To change the type of question, click on the circle icon on the right of Untitled Question and select the type of question you want.
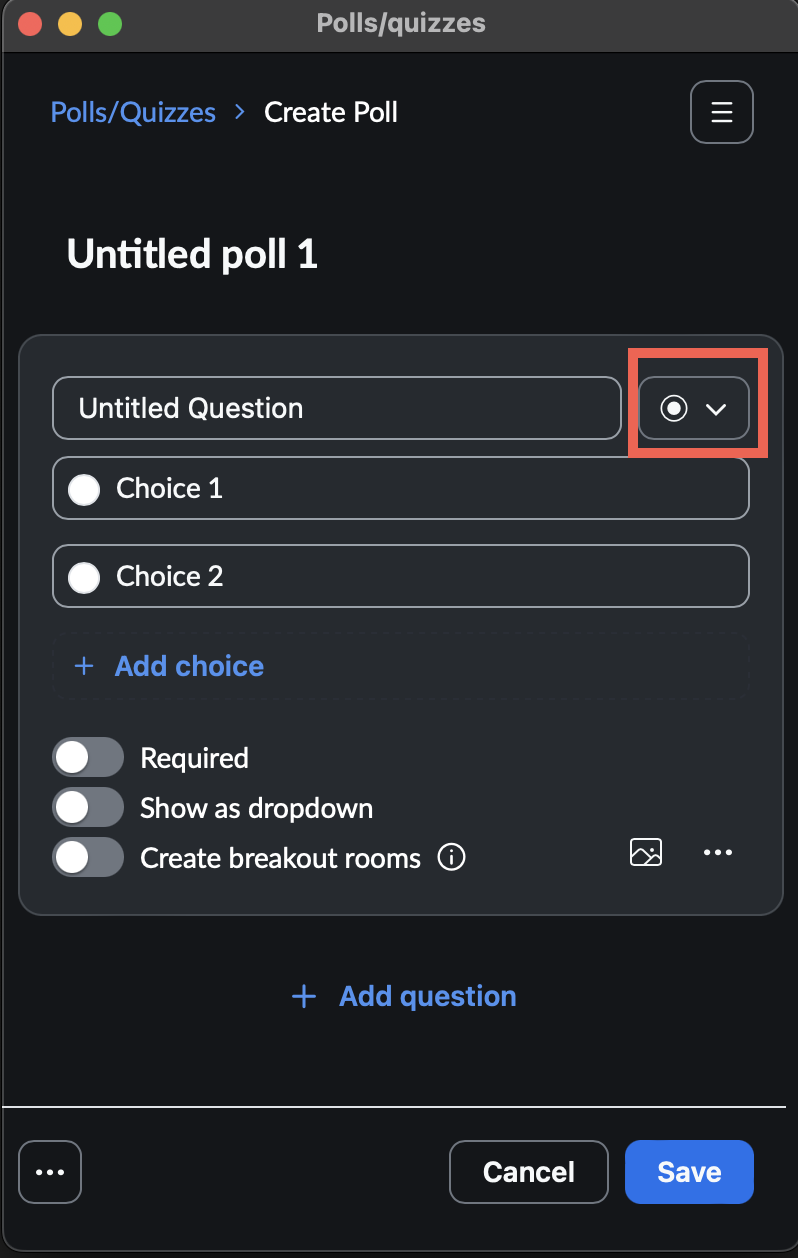
Edit the answer choices and click on “Save”.
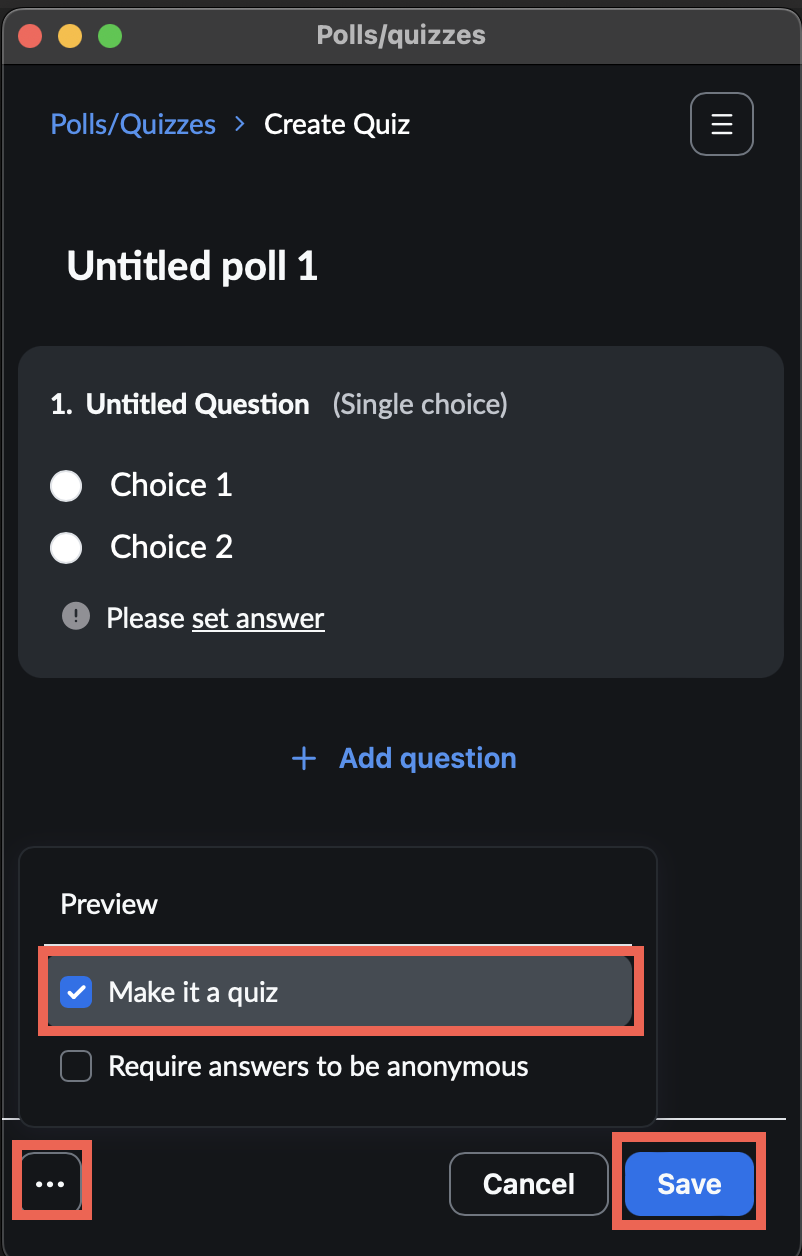
If you want to create a quiz, click on the three dots in the lower left corner and select “Make it a quiz”. Then, click on “Save”.
Note: If you set your poll to a quiz, you will have to set a correct answer for your question.
You can learn more about conducting quizzes in meetings from the Zoom Support page. However, advanced polls are not supported when creating polls ahead of time through Canvas.
Launch Zoom polls
After you have created a Zoom poll, you can launch Zoom polls during a live session.
Export Zoom poll results
- Go to https://zoom.us/account/report and sign in, if you haven’t already.
- Go to the Reports tab and click on Meeting.
- Choose Poll Report from the drop-down menu, select the desired date range, and click on “Search”.
- A list of meetings will be generated on the page. Search for the desired meeting and click on Generate on the last column.
- Zoom will redirect you to the Report Queues tab where you can Download the report as a CSV file.
Learn more about generating meeting reports for registration, Q&A, polling, and surveys.
Prevent Zoom Bombing
Zoom bombing is a practice where unwanted, disruptive intruders hijack the session with the insertion of inappropriate content, which can be posted online to video sharing platforms. The compromised Zoom session can typically be shut down by the host.
To prevent Zoom bombings, use the following best practices:
Use Zoom for Exam Invigilation
You can use Zoom for the invigilation of exams in real-time. Please refer to the Zoom for Exam Invigilation set-up guide for instructions on setting this up for your exam. There are specific settings that should be enabled/disabled for the Zoom meeting if it is used for invigilation purposes as opposed to an online lecture.
Additional Resources
FAQs
7. Why can’t my students share their screen?
- Sign into the Zoom web portal and navigate to the Settings.
- Scroll down to the section In Meeting (Basics).
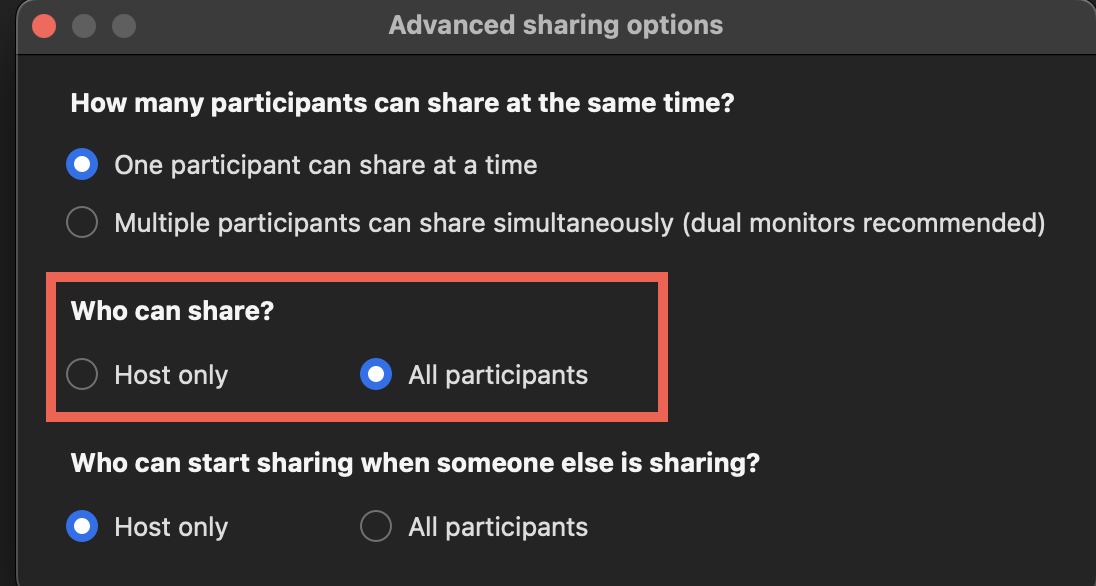
- Toggle on the Screen sharing option (it will become blue as shown in the image) to enable screen sharing.
- Under Who can share?, select All Participants to allow students to share their screens.
- Click on “Save”.

- These settings will be applied to all Zoom meetings you create until you change them.
As long as screen sharing is enabled in the global settings on the Zoom web portal, you can change the settings of who can share during your Zoom meeting.
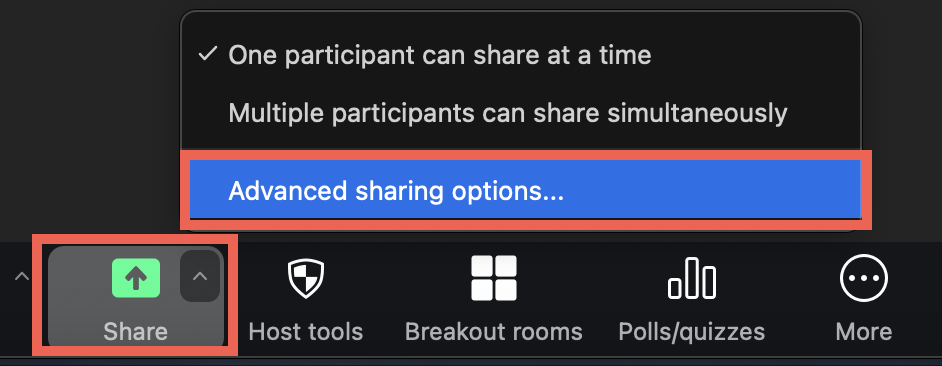
- On the bottom toolbar of your Zoom meeting interface, click on the Share.
- Click on Advanced Options, then select All Participants under Who can share? in the pop-up window (please refer to the images below).
11. How do I delete unwanted Zoom recordings?
Unwanted Zoom recordings that are recorded locally to your computer can be deleted from the computer directly.
Cloud recordings can be deleted through the Zoom web portal.
- Sign in to the Zoom web portal and click on Recordings.
- Click on the Cloud Recordings tab and select the recording you want to delete.
- A new page will then open. Click on the button Delete to the right of the recording file to delete the Cloud recording.
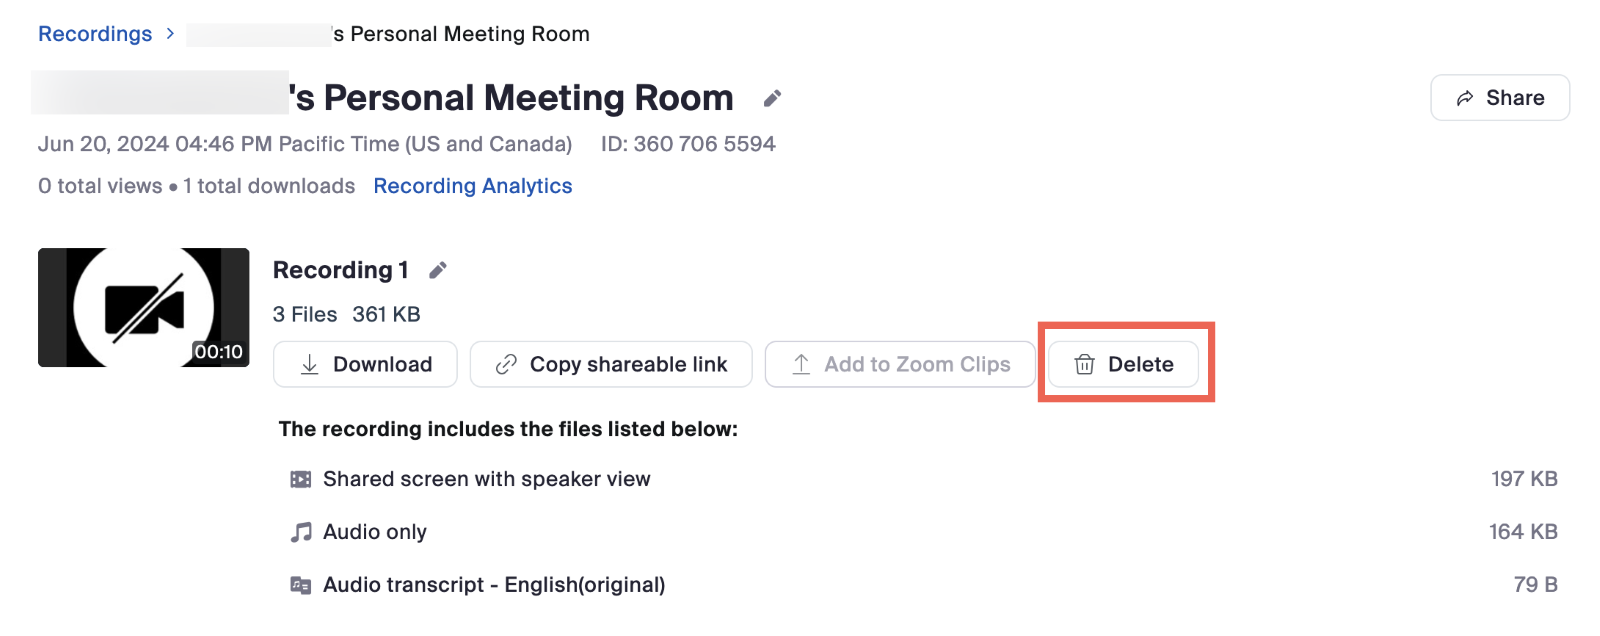
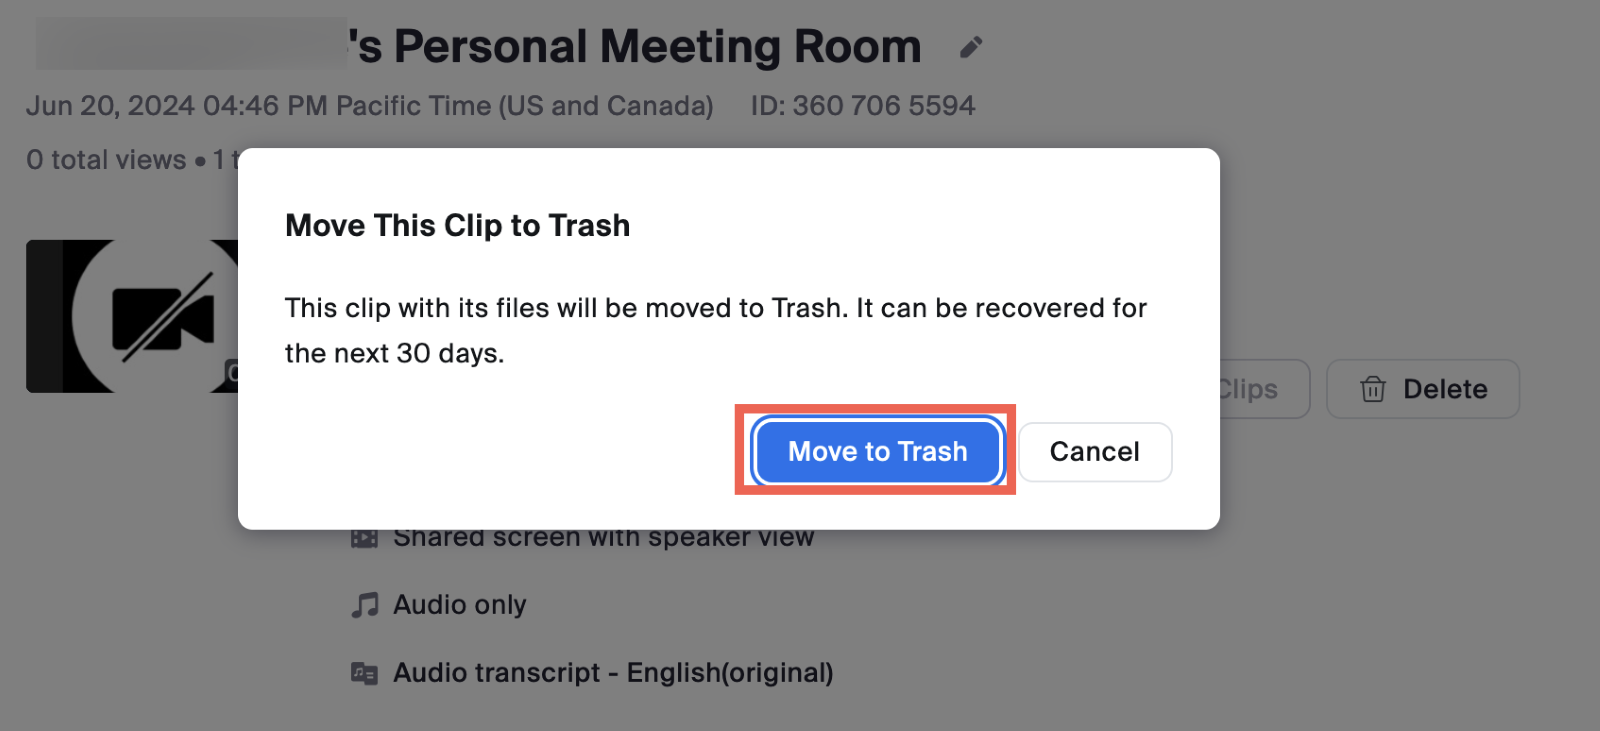
- A pop-up window will appear. Click on Move to Trash to delete all files of the recording.
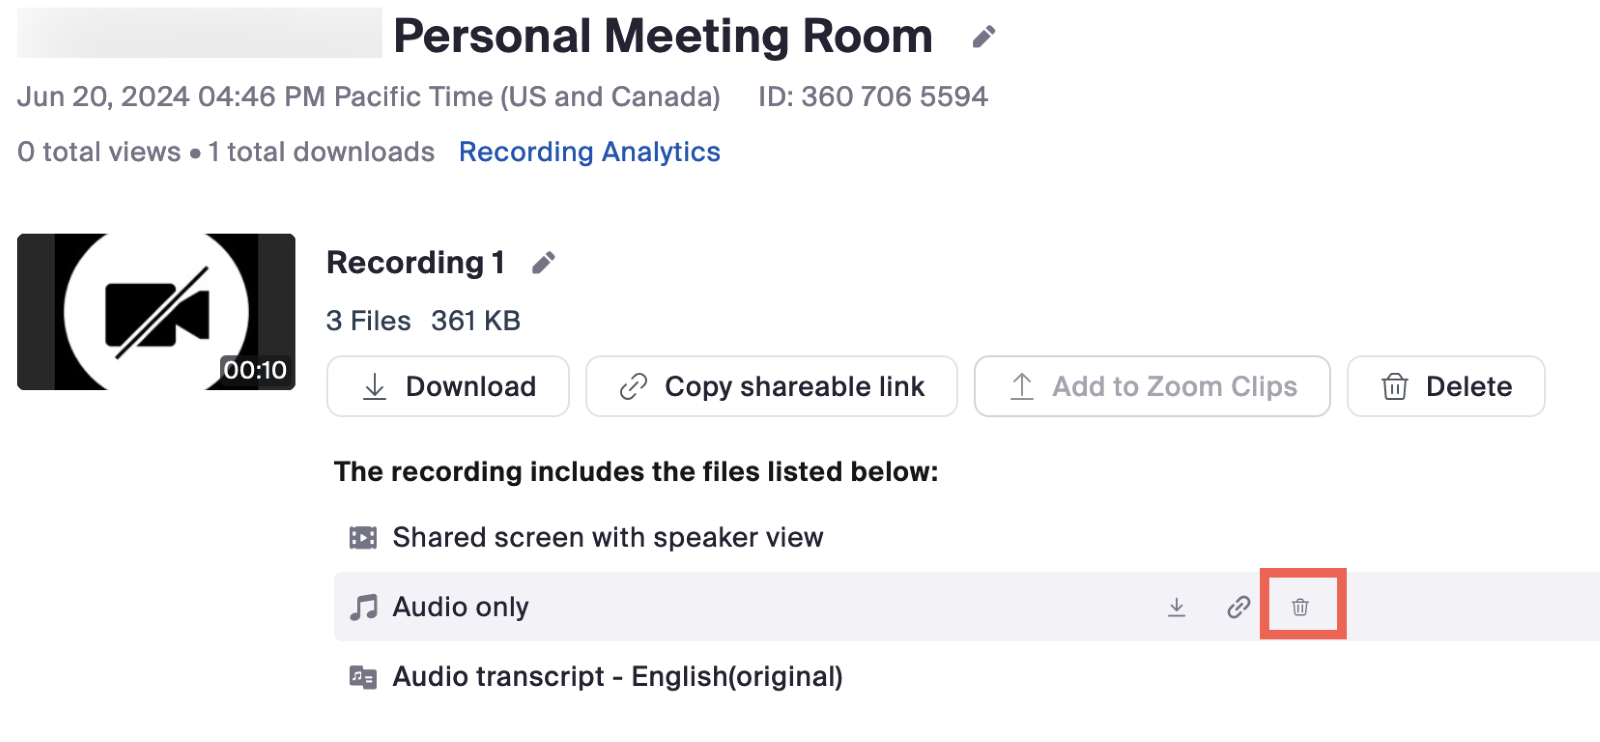
If you want to delete only some parts of the recording but not others, such as only deleting the audio, click on the Delete icon (trash can) once you hover over Audio only with your mouse. Another pop-up window will appear and click on Move to Trash to delete only the recording’s audio.
You will notice that on the Zoom web portal, there is also a Local Recordings tab. You can delete local recordings from the list of recordings under this tab, however this will not delete the actual recording. Local recordings must be deleted from your computer directly.
You can also delete Zoom cloud recordings on Canvas if they were recorded on Zoom through Canvas.
- From Canvas, click on Zoom from the Course Navigation.
- Click on the Cloud Recordings tab. Here you can see all the cloud recordings of Zoom meetings created and accessed through Canvas.
- Delete recordings from the list using the Delete buttons next to each recording. You can also click on the check boxes to the left of each recording to delete selected recordings (the button appears once recordings are selected) or delete all recordings using the Delete All button.
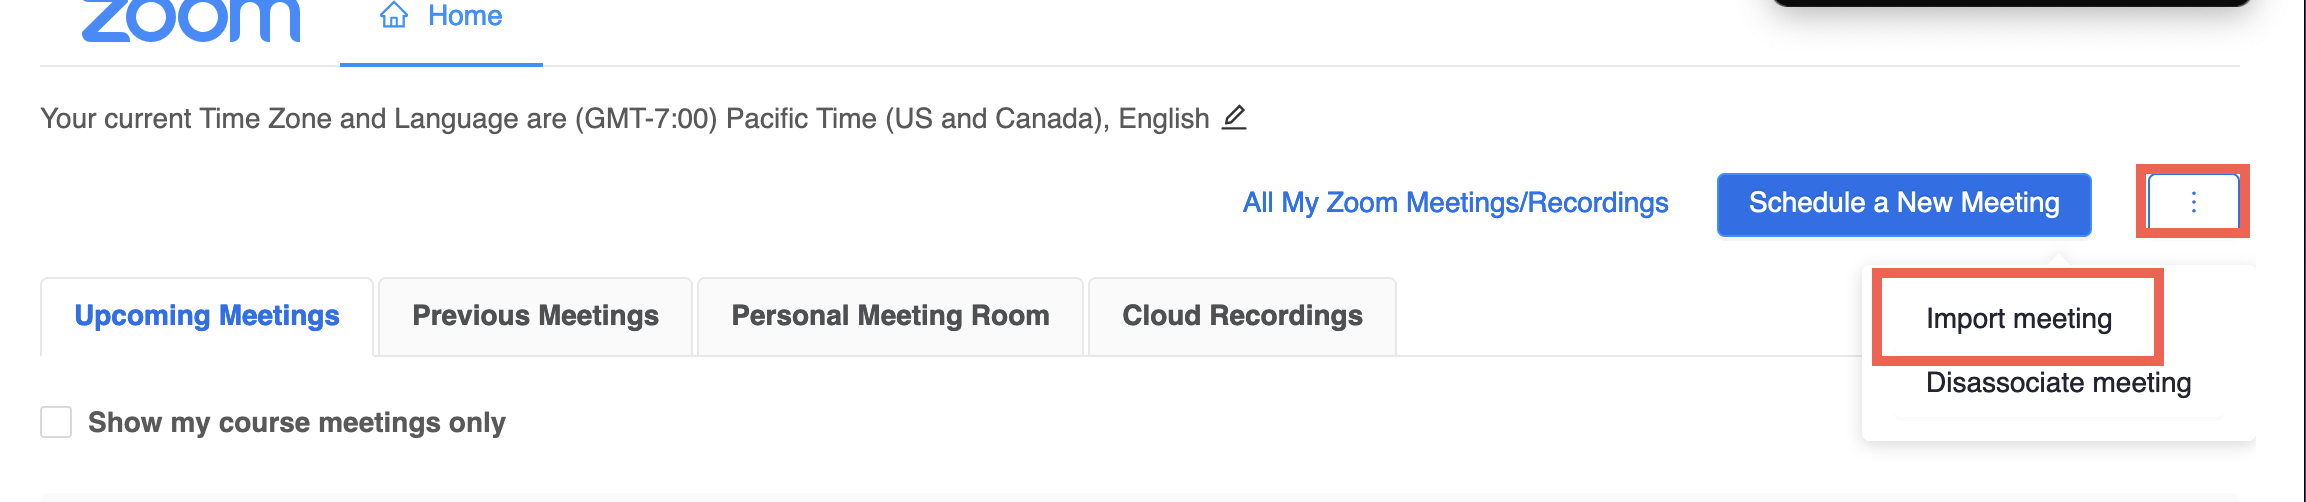
20. How can I import my Zoom meetings?
You can import the meetings by clicking on the three dots located on the right > Import Meeting. You will have to enter in the Meeting ID, which can be found under your meeting settings.
Last updated on: October 1, 2024